Lab 4: Preemptive Multitasking
lab3和lab4貌似都是超多的内容。尤其是lab4,一共有3个Part:A、B、C。
在这实验中需要实现抢占式多任务处理(preemptive multitasking),也就是按照优先级来同时运行多个active user-mode environments【用户进程】。
- Part A:将为JOS添加多处理器支持(multiprocessor),实现循环调度(round-robin scheduling),并添加基本的进程管理系统调用(创建和销毁进程环境以及分配/映射内存)。
- Part B:将实现Unix-like
fork(),它允许用户进程创建其自身的副本。 - Part C:将添加对进程间通信(IPC)的支持,从而允许不同的用户进程之间显式地通信和同步。最终还将添加对硬件时钟中断(hardware clock interrupts)和抢占(preemption)的支持。
首先我们提交Lab3,切换到lab4,然后merge lab4。这里会有一些冲突,解决冲突,保留merge后所有的code。
Lab4相关的文件总览如下:
- kern/cpu.h——Kernel-private definitions for multiprocessor support
- kern/mpconfig.c——Code to read the multiprocessor configuration
- kern/lapic.c——Kernel code driving the local APIC unit in each processor
- kern/mpentry.S——Assembly-language entry code for non-boot CPUs
- kern/spinlock.h——Kernel-private definitions for spin locks, including the big kernel lock
- kern/spinlock.c——Kernel code implementing spin locks
- kern/sched.c——Code skeleton of the scheduler that you are about to implement
整个实验至少要完成一个challenge呀。
Part A:Multiprocessor Support and Cooperative Multitasking
在PartA部分,我们首先要扩展JOS,使其在多处理器系统上运行,然后实现一些新的 JOS 内核系统调用,以允许用户进程创建其他新环境(to allow user-level environments to create additional new environments)。接着还会实现cooperative round-robin scheduling【一种进程调度】:在当前environment主动放弃CPU【voluntarily relinquishes the CPU (or exits)】,以允许kernel能够从一个environment切换到另外一个。在后面Part C中,还将实现抢占式调度,它允许内核在经过一段时间后从environment中重新获得对 CPU 的控制,即使environment并不配合。
Multiprocessor Support
对称多处理架构SMP是一种多处理器的电脑硬件架构。在对称多处理架构下,每个处理器的地位都是平等的,对资源的使用权限相同。现代多数的多处理器系统,都采用SMP(对称多处理架构)。在这个系统中,拥有超过一个以上的处理器,这些处理器都连接到同一个共享的主存上,并由单一操作系统来控制。在对称多处理系统上,在操作系统的支持下,无论进程是处于用户空间还是内核空间,都可以分配到任何一个处理器上运行。因此,进程可以在不同的处理器间移动,达到负载平衡,使系统的效率提升。
注意:每个processor跑一个进程,每个core跑一个线程【一个processor可以有多个core】。
在LAB4之前,所有的JOS代码都是在同一个处理器上执行的,这个处理器一般叫做Bootstrap Processor(BSP),简单理解来说就是,用于OS启动的那个CPU【引导处理器】。BSP具体是哪个处理器是由BIOS和硬件共同决定的。
在LAB4的一开始,我们要通过BSP来增加多处理器的支持,除了BSP之外的其它处理器一般叫做应用处理器Application Processors(APs)。多处理器共享许多硬件资源,例如内存和I/O总线,但是也有许多硬件资源并不是共享的,例如LAPIC单元,TSS等寄存器,因此需要在BSP初始化好之后再初始化其它APs,当然,此时page等也不再需要初始化了(**因为内存是共享的**)。
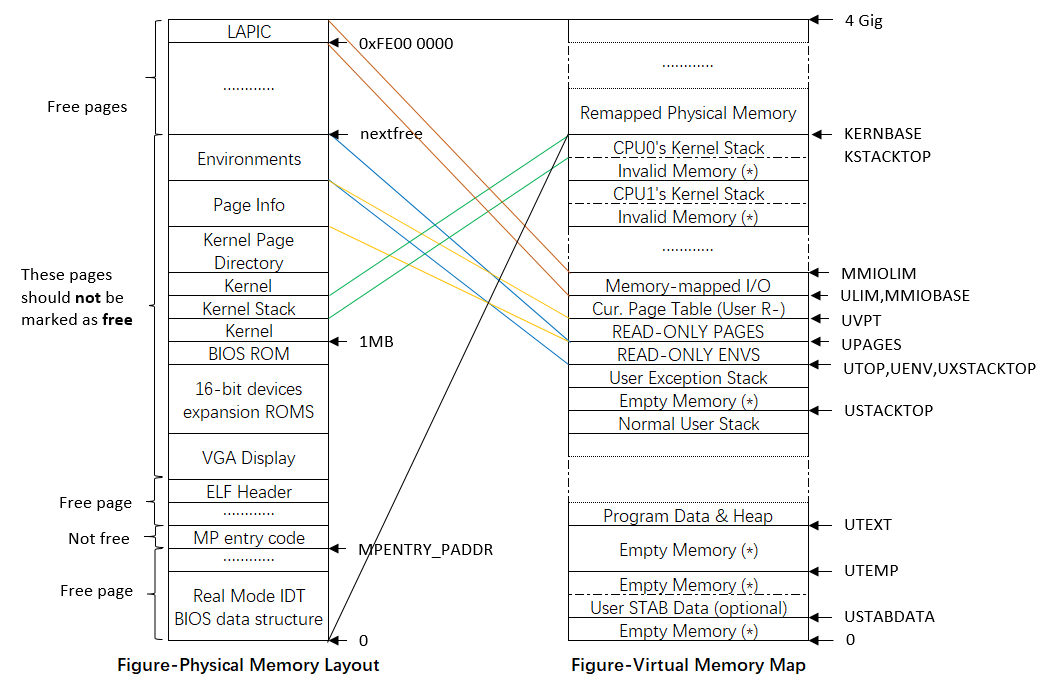
在LAB4中的内存映射关系如下所示,可以和LAB3的内存映射关系对比来看:
SMP架构下,每一个CPU都有一个独立的local APIC (LAPIC) 单元。LAPIC单元负责传送整个系统的中断。LAPIC 还给其连接的 CPU提供了一个唯一标识符APIC ID(The LAPIC also provides its connected CPU with a unique identifier)。
在这个实验室中,我们利用了 LAPIC 单元如下的基本功能(in kern/lapic.c) :
- Reading the LAPIC identifier (APIC ID) to tell which CPU our code is currently running on (see
cpunum()).- 获取APIC ID,以便允许的代码明确自己跑在哪个CPU上。
- Sending the
STARTUPinterprocessor interrupt (IPI) from the BSP to the APs to bring up other CPUs (seelapic_startap()).- 发送处理器之间的中断
STARUP【从BSP发到APs】,来启动其他CPU。
- 发送处理器之间的中断
- In part C, we program LAPIC’s built-in timer to trigger clock interrupts to support preemptive multitasking (see
apic_init()).- PartC中,我们还会实现LAPIC内部的定时器,来触发始终中断,以支持抢占式多任务机制。【避免一个任务霸占CPU太久】
处理器使用内存映射memory-mapped I/O (MMIO)访问其 LAPIC。在 MMIO 中,一部分物理内存硬连线hardwired到某些I/O设备的寄存器,因此通常用于操作内存的load/store指令相当于了访问设备寄存器。此前,其实我们已经在物理地址0xA0000处看到了一个I/O hole(我们用这片内存来写VGA display buffer)。
LAPIC 位于起始地址为物理地址0xFE000000(32MB short of 4GB)的hole。这个地址太高了,我们无法使用我们通常在KERNBASE进行的直接映射访问。【The LAPIC lives in a hole starting at physical address 0xFE000000 (32MB short of 4GB), so it’s too high for us to access using our usual direct map at KERNBASE.】
- 回顾之前Lab 2完成的映射,只有[0,4MB]和[KERNBASE,KERNBASE+4MB]的区域一一直接同步对应/映射到物理内存的[0,4MB]区域【0~0x400000】。
- 因此太高的物理内存是不能通过简单+KERNBASE找到对应的虚拟地址的。
JOS 虚拟内存在 MMIOBASE处留下了4MB 的空白内存空间,因此我们有一个地方可以映射LAPIC这样的设备。由于后面的实验室引入了更多的MMIO区域,因此您将编写一个简单的函数来分配该区域的空间并将设备内存映射到该区域。
Exercise 1
Implement
mmio_map_regioninkern/pmap.c. To see how this is used, look at the beginning oflapic_initinkern/lapic.c.You’ll have to do the next exercise, too, before the tests for
mmio_map_regionwill run.
// Reserve size bytes in the MMIO region and map [pa,pa+size) at this location.
// Return the base of the reserved region.
// size does *not* have to be multiple of PGSIZE.
// 给某个device,在MMIO区域预定一些位置,返回获得的MMIO子区域的首地址。size不需要是PGSIZE的整数倍。但是分配的时候是要的,请求的参数不要求。
void *
mmio_map_region(physaddr_t pa, size_t size)
{
	// Where to start the next region.
    // Initially, this is the beginning of the MMIO region.
    // Because this is static, its value will be preserved between calls to mmio_map_region
	// (just like nextfree in boot_alloc).
	static uintptr_t base = MMIOBASE;
    // base是静态变量,每个CPU中只会初始化一次。之后要一直维护这个base变量,一直保持为下一个待分配的MMIO内存区域
    // 初始值为 #define MMIOBASE	(MMIOLIM - PTSIZE)
    // 从这里可以看出MMIO区域只有一个页大小

	// Reserve size bytes of virtual memory starting at base and map physical pages [pa,pa+size) to virtual addresses [base,base+size).
    //Since this is device memory and not regular DRAM, you'll have to tell the CPU that it isn't safe to cache access to this memory.【不需要cache,而采用直写】
    // Luckily, the page tables provide bits for this purpose;
    // simply create the mapping with PTE_PCD|PTE_PWT (cache-disable and write-through) in addition to PTE_W.  (If you're interested in more details on this, see section 10.5 of IA32 volume 3A.)
	// Be sure to round size up to a multiple of PGSIZE and to handle if this reservation would overflow MMIOLIM (it's okay to simply panic if this happens).
	//
	// Hint: The staff solution uses boot_map_region.
	//
	// Your code here:
    size_t sizeUp = ROUNDUP(size,PGSIZE);
	if( base + sizeUp > MMIOLIM || base + sizeUp < base){
        panic("The mmio_map_region function overflows MMIOLIM!");
    }
  	boot_map_region(kern_pgdir,base,sizeUp,pa,(PTE_PCD|PTE_PWT|PTE_W));
    base +=sizeUp;
    return (void *)(base - sizeUp);
	//panic("mmio_map_region not implemented");
}
在boot up APs的之前,BSP需要收集一些多处理器系统的信息,比如:
- the total number of CPUs
- their APIC IDs
- the MMIO address of the LAPIC unit
kern/mpconfig.c中的mp_init()函数通过读取MP configuration table【存储在BIOS’region memory中】来获得以上信息。
此后,kern/init.c中的boot_aps()函数驱动AP的启动。起初AP以实模式启动【much like how the bootloader started in boot/boot.S】,之后boot_aps()复制AP的entry code(in kern/mpentry.S)到可寻址的内存区域中。与BSP中的bootloader 不同,我们可以控制 AP 从哪里开始执行代码。
在本实验中,我们将entry code复制到0x7000(MPENTRY_PADDR) ,但是实际上,任何在640KB以下的未使用的、页面对齐的物理地址作为AP start executing entry code的位置。
此后,boot_aps()通过从BSP发送STARTUP IPI(CPU间中断)到相应AP的LAPIC来逐个激活AP,同时传递标识了AP start running entry code的初始的 CS:IP地址((MPENTRY_PADDR in our case)。
The entry code in kern/mpentry.S is quite similar to that of boot/boot.S.
在一些简短的设置和初始化以后,entry code将AP设置为保护模式【开启页表】,然后调用 C setup routine,即mp_main()(also in kern/init.c)。
在这段期间,BSP执行的boot_aps()会等待AP发送CPU_STARTED信号【signal a CPU_STARTED flag in cpu_status field of its struct CpuInfo】,从而判断这个AP已经被激活并初始化完毕。然后BSP会接着再唤醒下一个。
Exercise 2
Read
boot_aps()andmp_main()inkern/init.c, and the assembly code inkern/mpentry.S. Make sure you understand the control flow transfer during the bootstrap of APs.Then modify your implementation of
page_init()inkern/pmap.cto avoid adding the page atMPENTRY_PADDRto the free list, so that we can safely copy and run AP bootstrap code at that physical address.
我们回顾i386_init()的代码:
void
i386_init(void)
{
	// Initialize the console.
	// Can't call cprintf until after we do this!
	cons_init();
	cprintf("6828 decimal is %o octal!\n", 6828);
	// Lab 2 memory management initialization functions
	mem_init();
	// Lab 3 user environment initialization functions
	env_init();
	trap_init();
	//在前几个lab,我们依次完成了内存初始化、用户空间初始化以及异常中断的初始化。
    //接下来的lab4,我们会进行下述初始化,并最终调用boot_aps()
    //
	// Lab 4 multiprocessor initialization functions
	mp_init();	//从BIOS中读取,多处理器信息
	lapic_init();	//初始化LAPIC

	// Lab 4 multitasking initialization functions
	pic_init();

	// Acquire the big kernel lock before waking up APs
    // 因为在boot_aps中会出现AP和BSP的并行执行,因此在调用boot_aps之前需要申请内核锁。
    //
	// Your code here:

	// Starting non-boot CPUs
	boot_aps();	//从这里开始启动APs,并进行APs的自身初始化。

    //在启动完所有APs后,我们将会启动执行第一个user environment
#if defined(TEST)
	// Don't touch -- used by grading script!
	ENV_CREATE(TEST, ENV_TYPE_USER);
#else
	// Touch all you want.
	ENV_CREATE(user_primes, ENV_TYPE_USER);
#endif // TEST*

	// Schedule and run the first user environment!
	sched_yield();
}
在i386_init()中会调用boot_aps(),boot_aps()的实现的流程和上述分析一致:
// While boot_aps is booting a given CPU, it communicates the per-core
// stack pointer that should be loaded by mpentry.S to that CPU in
// this variable.
void *mpentry_kstack;	//每个AP CPU的stack位置

// Start the non-boot (AP) processors.
static void
boot_aps(void)
{
	extern unsigned char mpentry_start[], mpentry_end[];
	void *code;
	struct CpuInfo *c;

	// Write entry code to unused memory at MPENTRY_PADDR!!
	code = KADDR(MPENTRY_PADDR);	//MPENTRY_PADDR = 0x7000
    //将entry code复制到code 变量位置,也就是MPENTRY_PADDR物理地址【MPENTRY_PADDR+KERNBASE虚拟地址】的位置。
    //mpentry_start和mpentry_end由mpentry.S指定,是entry code的实际内容。此时已经加载到低地址MPENTRY_PADDR=0x7000的内存中,等待调用执行。
	memmove(code, mpentry_start, mpentry_end - mpentry_start);

	// Boot each AP one at a time
    // ncpu
	for (c = cpus; c < cpus + ncpu; c++) {	//遍历每个cpus
		if (c == cpus + cpunum())  // We've started already.
			continue;

		// Tell mpentry.S what stack to use【确定每一个cpu的stack位置】
        // 设置kernel stack的大小为KSTKSIZE = 8页大小
        // percpu_kstacks是在mem_init_mp确定的,大概就是KSTACKTOP往下进行分配的,之后会具体涉及。
		mpentry_kstack = percpu_kstacks[c - cpus] + KSTKSIZE;
		// Start the CPU at mpentry_start
		lapic_startap(c->cpu_id, PADDR(code));	//PADDR返回物理地址。通过lapic_startap来发送startup IPI CPU间中断给AP,并且通过PADDR(code)给出entry code的位置。
		// Wait for the CPU to finish some basic setup in mp_main()
        // lapic_startap位于kern/lapic.c,在这里发生了处理器的切换。从mpentry_start开始就是由被激活的CPU执行的,换而言之,从mpentry_start开始,这部分代码和BSP就是完全并行执行。
        //这也是为什么在lapic_startap(c->cpu_id, PADDR(code))之后,需要BSP不断自旋直到该APs初始化完毕的原因:
		while(c->cpu_status != CPU_STARTED)
			;	//完成一个AP的启动,继续进行下一个AP的启动
	}
}
这里我们还需要在阅读一下kern/mpentry.S:
###################################################################
# entry point for APs
###################################################################

# Each non-boot CPU ("AP") is started up in response to a STARTUP IPI from the boot CPU.
# Section B.4.2 of the Multi-Processor Specification says that the AP will start in real mode with CS:IP set to XY00:0000, where XY is an 8-bit value sent with the STARTUP.
# Thus this code must start at a 4096-byte boundary.
# BSP CPU会发送STARTUP IPI给APs,且还会附带发送8-bit,即1字节的XY值。在AP收到后,会以实模式启动并且将CS:IP设置为XY00:0000=0xXY000地址处【4KB对齐】。
# 在这里,我们设置CS:IP=0700:0000=0x7000=MPENTRY_PADDR
# Because this code sets DS to zero, it must run from an address in the low 2^16 bytes of physical memory.
#
# boot_aps() (in init.c) copies this code to MPENTRY_PADDR (which satisfies the above restrictions).
# Then, for each AP, it stores the address of the pre-allocated per-core stack in mpentry_kstack, sends the STARTUP IPI, and waits for this code to acknowledge that it has started (which happens in mp_main in init.c).
# 之后在mp_main(in init.c)中会设置cpu_status为CPU_STARTED表示该AP已启动。
# 这个AP启动(mpentry.S)和BSP启动(boot.S)的差别:
# This code is similar to boot/boot.S except that
#    - it does not need to enable A20
#    - it uses MPBOOTPHYS to calculate absolute addresses of its symbols, rather than relying on the linker to fill them

#define RELOC(x) ((x) - KERNBASE)
#define MPBOOTPHYS(s) ((s) - mpentry_start + MPENTRY_PADDR)
# 依赖于MPBOOTPHYS宏计算符号的绝对地址,而不使用链接器。【其实是转化为了物理地址】
.set PROT_MODE_CSEG, 0x8	# kernel code segment selector
.set PROT_MODE_DSEG, 0x10	# kernel data segment selector

.code16
.globl mpentry_start
mpentry_start:
	cli

	xorw    %ax, %ax
	movw    %ax, %ds
	movw    %ax, %es
	movw    %ax, %ss

	lgdt    MPBOOTPHYS(gdtdesc)	# 加载GDT表
	movl    %cr0, %eax
	orl     $CR0_PE, %eax
	movl    %eax, %cr0			# 保护模式使能

	ljmpl   $(PROT_MODE_CSEG), $(MPBOOTPHYS(start32))
	# 实模式跳转。段寄存器:段内偏移。
	# 这条指令执行的结果会将$PROT_MODE_CSEG加载到cs中,cs对应的高速缓冲存储器【selector】会加载GDT代码段描述符,同样将$(MPBOOTPHYS(start32))加载到ip中
	# 跳转到保护模式32位地址下执行。
	# 简单来说就是kern/mpentry.S引用的符号对应的地址是虚拟地址,高于KERNBASE【因为kern/mpentry.S是内核代码,所以符号start32都会被linker解析为虚拟地址的】,直接把虚拟地址当成物理地址,那么必然会加载未知的物理内存数据,必然出错。因此需要使用MPBOOTPHYS切换成物理地址【实模式下】。

.code32			 # Assemble for 32-bit mode 指导生成32位汇编代码
start32:
	movw    $(PROT_MODE_DSEG), %ax
	movw    %ax, %ds
	movw    %ax, %es
	movw    %ax, %ss
	movw    $0, %ax
	movw    %ax, %fs
	movw    %ax, %gs

	# Set up initial page table. We cannot use kern_pgdir yet because we are still running at a low EIP.
	movl    $(RELOC(entry_pgdir)), %eax		#设置初始页表【低端的内存是由人工构造的entry_pgdir来负责映射的】
	movl    %eax, %cr3		# 放置entry_pgdir页表到页目录寄存器cr3中
	# Turn on paging.
	movl    %cr0, %eax
	orl     $(CR0_PE|CR0_PG|CR0_WP), %eax
	movl    %eax, %cr0	#开启虚拟空间【页表寻址】

	# Switch to the per-cpu stack allocated in boot_aps()
	# 设置栈帧,准备运行c代码
	movl    mpentry_kstack, %esp
	movl    $0x0, %ebp       # nuke frame pointer

	# Call mp_main().  (Exercise for the reader: why the indirect call?)
	movl    $mp_main, %eax
	call    *%eax				#注意这里使用了间接跳转【mp_main属于内核代码,在高地址处,所以采用间接跳转比较稳妥?还是说是因为符号解析的问题,mp_main是由linker进行的?】

	# If mp_main returns (it shouldn't), loop.
spin:
	jmp     spin

# Bootstrap GDT
.p2align 2					# force 4 byte alignment
gdt:
	SEG_NULL				# null seg
	SEG(STA_X|STA_R, 0x0, 0xffffffff)	# code seg【XR权限】
	SEG(STA_W, 0x0, 0xffffffff)		# data seg【W权限】

gdtdesc:
	.word   0x17				# sizeof(gdt) - 1
	.long   MPBOOTPHYS(gdt)			# address gdt

.globl mpentry_end
mpentry_end:
	nop
最后会在上述entry code中调用mp_main,进行APs的set up:
// Setup code for APs
void
mp_main(void)
{
	// We are in high EIP now, safe to switch to kern_pgdir
    //通过间接跳转,我们进入了高端内存,此后由kern_pgdir负责页表映射。
	lcr3(PADDR(kern_pgdir));	//load cr3
	cprintf("SMP: CPU %d starting\n", cpunum());  //现在启动某个AP,进行下述初始化【lapic、env、trap……】

	lapic_init();
	env_init_percpu();
	trap_init_percpu();
	xchg(&thiscpu->cpu_status, CPU_STARTED); // tell boot_aps() we're up
	//设置cpu_status为CPU_STARTED,告诉正在运行boot_aps()的BSP,这个AP已经启动,此时BSP就能够继续初始化下一个APs或者开始运行第一个User Environment。
	// Now that we have finished some basic setup, call sched_yield() to start running processes on this CPU.
    // But make sure that only one CPU can enter the scheduler at a time!
	// 这里之后应该要申请内核锁kernel_lock来避免两个处理器并行运行【由于现在kernel_lock是由BSP占有的,所以每个AP都抢不到kernel_lock而进入阻塞状态】。
    //由于此时至少存在两个处理器是并行地运行,若不使用内核锁来确保同时只能有一个CPU执行一些关键的内核代码,就必然会产生并发错误,例如,在不使用内核锁的情况下,假设两个CPU同时进入了Scheduler,那么就可能导致两个CPU同时执行同一个User Environment的严重的并发错误,除此之外,创建Environment,分配Page等等都可能产生Race Condition,这显然不对。
    //也因此BSP在调用boot_aps之前必须申请kernel_lock,这样当所有APs还没初始化成功之前(即BSP的boot_aps还没返回之前)已完成初始化的APs都会被阻塞在mp_main的lock_kernel上,因为此时kernel_lock被BSP持有。
	// Your code here:
	lock_kernel();
    sched_yield();
	// Remove this after you finish Exercise 6
	for (;;);
}
整个APs的启动流程就是:
kern/init.c:i386_init ==> kern/init.c:boot_aps => Pass control to kern/lapic.c: lapic_startap and switch to the booted processor to execute rest code/instruction. => kern/mpentry.S:mpentry_start => kern/init.c:mp_main
在了解完APs的启动之后,我们修改page_init()(in kern/pmap.c)以免将MPENTRY_PADDR附近区域页面放置到free list中,此后意外分配出去。
void
page_init(void)
{
	size_t i, extendedFree = PGNUM(PADDR(boot_alloc(0)));
	for(i = 0; i < npages; ++i){
		pages[i].pp_ref = 0;
		if(i == 0 || (i >= npages_basemem && i < extendedFree) || i == PGNUM(MPENTRY_PADDR)){	//change here
			pages[i].pp_link = NULL;
		}else{
			pages[i].pp_link = page_free_list;
			page_free_list = &pages[i];
		}
	}
}
Your code should pass the updated check_page_free_list() test (but might fail the updated check_kern_pgdir() test, which we will fix soon).
Question
Compare
kern/mpentry.Sside by side withboot/boot.S.Bearing in mind that
kern/mpentry.Sis compiled and linked to run aboveKERNBASEjust like everything else in the kernel, what is the purpose of macroMPBOOTPHYS? Why is it necessary inkern/mpentry.Sbut not inboot/boot.S? In other words, what could go wrong if it were omitted inkern/mpentry.S?Hint: recall the differences between the link address and the load address that we have discussed in Lab 1.
kern/mentry.S与boot/boot.S主要有以下两点区别:
- kern/mentry.S不需要使能A20;
- kern/mentry.S需要使用宏MPBOOTPHYS来计算它所引用的符号(symbol)的绝对地址而不是和boot/boot.S一样依赖于链接器(linker)。
正如前面所提到的,kern/mpentry.S实际上是内核代码,它们的地址都在KERNBASE之上【需要页表转换后才可以使用的】,而mpentry.S作为APs的boot代码,运行在低地址【lapic_startap是在低地址的MPENTRY_PADDR启动运行AP的】,因此需要使用宏MPBOOTPHYS来计算物理地址,随后执行mpentry.S时运行在实模式之下。
内存是AP和BSP共享的,因此在AP进入页目录虚拟寻址之前的地址,处于实模式的地址都要是物理地址,但是这段代码是从内核copy过来的,因此当时BSP的linker都是解析符号为虚拟地址,因此需要靠宏MPBOOTPHYS转换过来。而之后,进入32位代码,开启保护模式,进行虚拟空间寻址之后,直接使用linker的符号就可以了。
#define MPBOOTPHYS(s) ((s) - mpentry_start + MPENTRY_PADDR) //计算物理地址
eg:
    ljmpl   $(PROT_MODE_CSEG), $(MPBOOTPHYS(start32))  //实模式
    movl    $mp_main, %eax		//保护模式
但是在boot/boot.S这部分代码实际上是由BIOS直接加载到了物理地址0x7c00,因此不需要使用宏来计算绝对地址。简单来说就是kern/mpentry.S引用的符号对应的地址是虚拟地址,高于KERNBASE,因此若不使用MPBOOTPHYS计算绝对地址/物理地址,直接把虚拟地址当成物理地址,那么必然会加载未知的物理内存数据,必然出错。
boot.S中,由于尚没有启用分页机制,所以我们能够指定程序开始执行的地方以及程序加载的地址;但是,在mpentry.S的时候,由于主CPU已经处于保护模式下了,因此是不能直接指定物理地址的,因此需要这个宏映射到相应的物理地址。
Per-CPU State and Initialization
当要实现一个multiprocessor OS,最关键的是要区别per-CPU state【这是每一个处理器私有的】和global state【这是整个系统共享的】。
kern/cpu.h中定义了per-CPU state,包括struct CpuInfo,其存储了每一个CPU变量。cpunum ()总是返回调用它的 CPU 的 ID,它可以用作cpus等数组的index。此外,thiscpu宏可以作为the current CPU’s struct CpuInfo。
以下是您应该注意的 per-CPU state:
-
Per-CPU kernel stack.
-
因为多个 cpu 可以同时陷入内核中,所以我们需要为每个处理器分配一个单独的内核栈,以防止它们相互干扰对方的执行。The array
percpu_kstacks[NCPU][KSTKSIZE]reserves space for NCPU’s worth of kernel stacks. -
在Lab2中,我们曾将KSTACKTOP以下的物理内存映射为BSP的kernal stack【即bootstack】。类似地,在这个实验室中,您将把每个 CPU 的内核栈映射到这个区域,并使用guard pages【保护页,invalid memory】作为它们之间的缓冲区,不允许越界访问到隔壁CPU的kernel stack。 即CPU0的kernel stack依旧是从KSTACKTOP往下增长,CPU1 kernel stack是从CPU0 kernel stack底部的KSTKGAP字节处开始,以此类推。以下是
inc/memlayout.h显示的映射布局。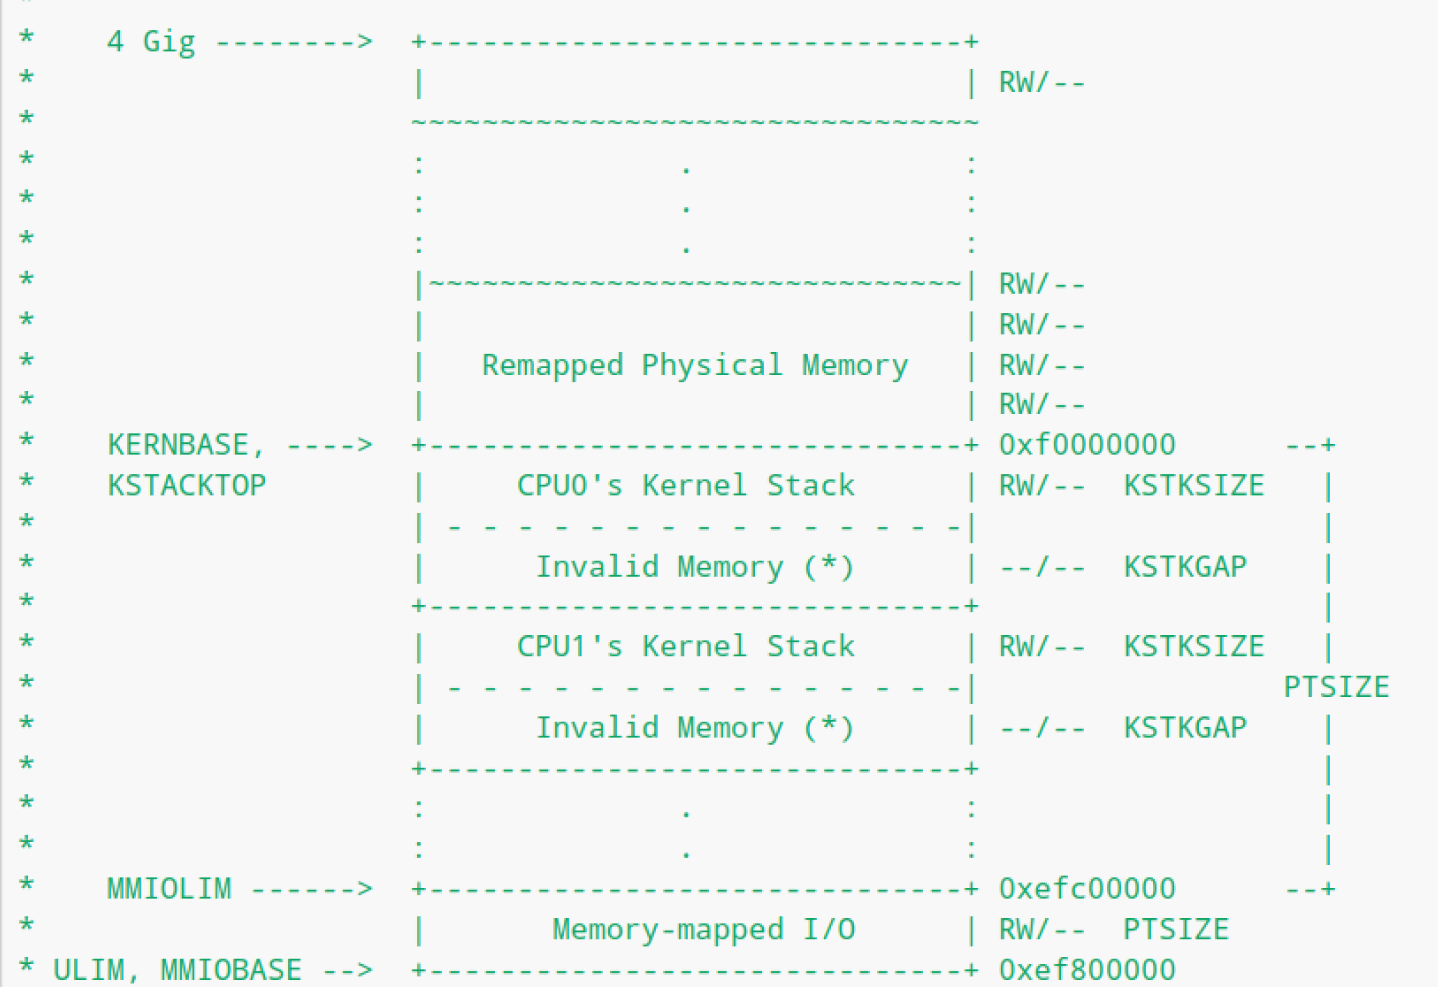
-
-
Per-CPU TSS and TSS descriptor.
- A per-CPU task state segment (TSS) 用于指定每一个CPU的kernel stack所在的位置。对于CPU i,其TSS存储在
cpus[i].cpu_ts,相应地TSS descriptor被定义在GDT条目gdt[(GD_TSS0 >> 3) + i]中。 - 在 kern/trap.c 中定义的全局变量 ts 将不再有用。
- A per-CPU task state segment (TSS) 用于指定每一个CPU的kernel stack所在的位置。对于CPU i,其TSS存储在
-
Per-CPU current environment pointer.
- 由于每一个CPU可以同时运行不同的user process,因此我们需要重新定义符号
curenv,而将其修改为cpus[cpunum()].cpu_env或是thiscpu->cpu_env,以此来指明当前CPU正在执行的environment。
- 由于每一个CPU可以同时运行不同的user process,因此我们需要重新定义符号
-
Per-CPU system registers.
- 所有寄存器对于一个CPU而言都是私有的(including system registers)。因此初始化这些寄存器的指令,如 lcr3()、 ltr ()、 lgdt ()、 lidt ()等必须在每个 CPU 上执行一次。
- Functions
env_init_percpu()andtrap_init_percpu()are defined for this purpose.
In addition to this, if you have added any extra per-CPU state or performed any additional CPU-specific initialization (by say, setting new bits in the CPU registers) in your solutions to challenge problems in earlier labs, be sure to replicate them on each CPU here!
接下来就进入到exercise 3和4
Exercise 3
Modify
mem_init_mp()(inkern/pmap.c) to map per-CPU stacks starting atKSTACKTOP, as shown ininc/memlayout.h. The size of each stack isKSTKSIZEbytes plusKSTKGAPbytes of unmapped guard pages.Your code should pass the new check in
check_kern_pgdir().
mem_init()中会调用mem_init_mp(),其实就是要为每个CPU分配栈空间,具体实现如下:
// Modify mappings in kern_pgdir to support SMP
//   - Map the per-CPU stacks in the region [KSTACKTOP-PTSIZE, KSTACKTOP)
//
static void
mem_init_mp(void)
{
	// Map per-CPU stacks starting at KSTACKTOP, for up to 'NCPU' CPUs.
	//
	// For CPU i, use the physical memory that 'percpu_kstacks[i]' refers
	// to as its kernel stack. CPU i's kernel stack grows down from virtual
	// address kstacktop_i = KSTACKTOP - i * (KSTKSIZE + KSTKGAP), and is
	// divided into two pieces, just like the single stack you set up in
	// mem_init:
	//     * [kstacktop_i - KSTKSIZE, kstacktop_i)
	//          -- backed by physical memory
	//     * [kstacktop_i - (KSTKSIZE + KSTKGAP), kstacktop_i - KSTKSIZE)
	//          -- not backed; so if the kernel overflows its stack,
	//             it will fault rather than overwrite another CPU's stack.
	//             Known as a "guard page".
	//     Permissions: kernel RW, user NONE
	//
	// LAB 4: Your code here:
	uint32_t CPU_i = 0;
    //注意循环从CPU_i = 0开启,这意味着我们不再使用bootstack,而是 percpu_kstacks[0]
	for(;CPU_i< NCPU;++CPU_i){
		uintptr_t startStacki = KSTACKTOP - CPU_i*(KSTKSIZE+KSTKGAP);	//每次偏移KSTKSIZE+KSTKGAP
        //这里要注意一点,由于boot_map_region是设置[va,va+size],虽然CPU i的stack起点是startStacki,往低地址伸展KSTKSIZE,但是map的时候是从低地址~高地址进行映射,因此设置映射范围为[startStacki-KSTKSIZE,startStacki]。
boot_map_region(kern_pgdir,startStacki-KSTKSIZE,KSTKSIZE,PADDR(percpu_kstacks[CPU_i]),PTE_W|PTE_P);	//只映射KSTKSIZE大小为有效
        //percpu_kstacks[CPU_i]属于内核变量,位于KERNBASE之上,使用PADDR转换为物理地址,映射到虚拟空间KERNBASE之下的区域。
	}
}
Exercise 4
The code in
trap_init_percpu()(kern/trap.c) initializes the TSS and TSS descriptor for the BSP. It worked in Lab 3, but is incorrect when running on other CPUs. Change the code so that it can work on all CPUs.(Note: your new code should not use the global
tsvariable any more.)
trap_init()会调用trap_init_percpu()。由于每个CPU有着独立的内核栈,因此我们还需要修改每个CPU对应的TSS(Task State Segment),并且将CPU对应的TSS descriptor写入到GDT中:
// Initialize and load the per-CPU TSS and IDT
void
trap_init_percpu(void)
{
	// The example code here sets up the Task State Segment (TSS) and
	// the TSS descriptor for CPU 0. But it is incorrect if we are
	// running on other CPUs because each CPU has its own kernel stack.
	// Fix the code so that it works for all CPUs.
	//
	// Hints:
	//   - The macro "thiscpu" always refers to the current CPU's
	//     struct CpuInfo;
	//   - The ID of the current CPU is given by cpunum() or
	//     thiscpu->cpu_id;
	//   - Use "thiscpu->cpu_ts" as the TSS for the current CPU,
	//     rather than the global "ts" variable;
	//   - Use gdt[(GD_TSS0 >> 3) + i] for CPU i's TSS descriptor;
	//   - You mapped the per-CPU kernel stacks in mem_init_mp()
	//   - Initialize cpu_ts.ts_iomb to prevent unauthorized environments
	//     from doing IO (0 is not the correct value!)
	//
	// ltr sets a 'busy' flag in the TSS selector, so if you
	// accidentally load the same TSS on more than one CPU, you'll
	// get a triple fault.  If you set up an individual CPU's TSS
	// wrong, you may not get a fault until you try to return from
	// user space on that CPU.
	//
	// LAB 4: Your code here:
	// 可以使用cpunum()或thiscpu->cpu_id
	// Setup a TSS so that we get the right stack
	// when we trap to the kernel.
	thiscpu->cpu_ts.ts_esp0 = KSTACKTOP-thiscpu->cpu_id *(KSTKSIZE+KSTKGAP);
	thiscpu->cpu_ts.ts_ss0 = GD_KD;
	thiscpu->cpu_ts.ts_iomb = sizeof(struct Taskstate);

	// Initialize the TSS slot of the gdt.
	gdt[(GD_TSS0 >> 3)+thiscpu->cpu_id] = SEG16(STS_T32A, (uint32_t) (&(thiscpu->cpu_ts)),
					sizeof(struct Taskstate) - 1, 0);
	gdt[(GD_TSS0 >> 3)+thiscpu->cpu_id].sd_s = 0;

	// Load the TSS selector (like other segment selectors, the
	// bottom three bits are special; we leave them 0)
	ltr(GD_TSS0+8*thiscpu->cpu_id);	//GDT条目大小是8字节

	// Load the IDT
	lidt(&idt_pd);
}
在JOS中,TSS暂时只用于负责指定right stack,同时也负责kernel-user stack的栈帧切换
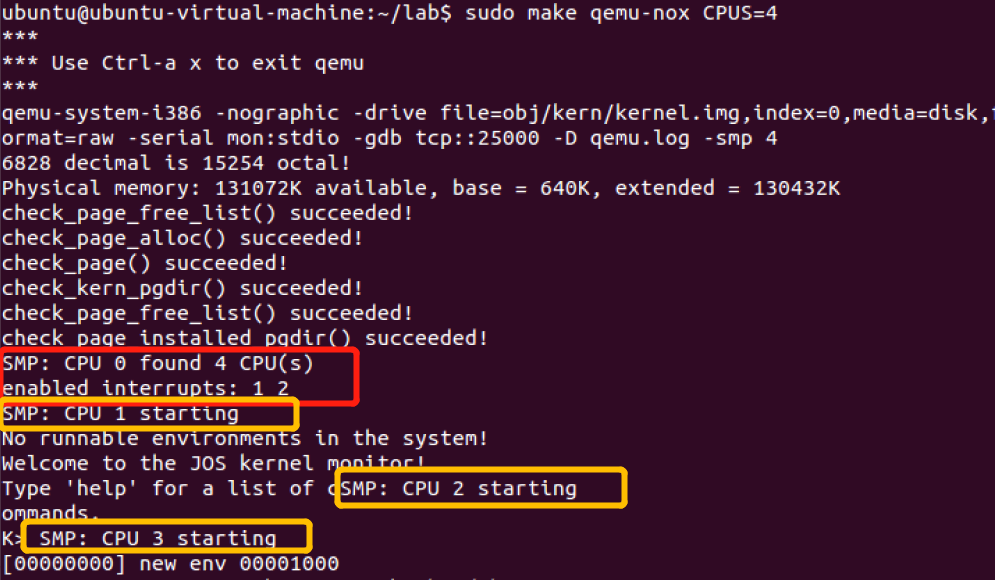
当您完成上述练习后,run JOS in QEMU with 4 CPUs using make qemu CPUS=4 (or make qemu-nox CPUS=4)。你可以看到如下输出:
Locking
原始代码会在进入mp_main之后开始自旋【mp_main的最后是for(;;);】。为了让AP可以更进一步执行,我们需要解决当多个CPU同时运行内核代码时的条件竞争问题。一个简单的解决方案是使用内核锁a big kernel lock:
// Setup code for APs
void
mp_main(void)
{
	// We are in high EIP now, safe to switch to kern_pgdir
	lcr3(PADDR(kern_pgdir));
	cprintf("SMP: CPU %d starting\n", cpunum());
	//basic setup
	lapic_init();
	env_init_percpu();
	trap_init_percpu();
	xchg(&thiscpu->cpu_status, CPU_STARTED); // tell boot_aps() we're up
    // But make sure that only one CPU can enter the scheduler at a time!
	lock_kernel();	//开启内核锁
	sched_yield();	//start running processes on this CPU.
	for (;;);	//自旋 【Remove this after you finish Exercise 6】
}
big kernel lock是一个全局锁。当一个environment 进入内核模式时会申请这个lock,当environment 回到用户模式时释放这个lock。在这样的模型中,处于用户模式的多个environment可以在任何可用的CPU上并行执行,但是只有不超过一个environment可用运行在kernel mode下,任何其他也想要进入内核模式的environment需要wait。
kern/spinlock.h声明了big kernel lock,即kernel_lock。还提供了lock_kernel()和unlock_kernel()函数用于申请锁和释放锁。
你应该在以下4个位置运用big kernel lock:
- In
i386_init(), acquire the lock before the BSP wakes up the other CPUs. - In
mp_main(), acquire the lock after initializing the AP, and then callsched_yield()to start running environments on this AP. - In
trap(), acquire the lock when trapped from user mode.- To determine whether a trap happened in user mode or in kernel mode, check the low bits of the
tf_cs.
- To determine whether a trap happened in user mode or in kernel mode, check the low bits of the
- In
env_run(), release the lock right before switching to user mode. Do not do that too early or too late, otherwise you will experience races or deadlocks.
Exercise 5
Apply the big kernel lock as described above, by calling
lock_kernel()andunlock_kernel()at the proper locations.
//i386_init
lock_kernel();
boot_aps();

//mp_main
lock_kernel();
sched_yield();

//trap
if ((tf->tf_cs & 3) == 3) {	//Trapped from user mode
    lock_kernel();
    assert(curenv);
    ......
}
//env_run
lcr3(PADDR(curenv->env_pgdir));
unlock_kernel();	//进入用户态之前unlock
env_pop_tf(&(curenv->env_tf));	//触发iret进入用户态
如何判断自己是否locking correct?等到实现了Exercise 6就知道了。
Question
It seems that using the big kernel lock guarantees that only one CPU can run the kernel code at a time. Why do we still need separate kernel stacks for each CPU?
Describe a scenario in which using a shared kernel stack will go wrong, even with the protection of the big kernel lock.
这里就有一个问题了,既然通过kernel lock可用保证只有一个CPU在运行kernel code,为什么还要为每一个CPU设置 kernel stack呢?
我们来回顾一下为什么在trap中需要申请Kernel Lock?
在Lab3中,我们设置的Trap control flow如下:

- 从processor hardware(APIC)探测到的Exception Vector根据我们在LAB3设置的IDT可以找到对应的Interrupt Descriptor,而该Interrupt Descriptor中保存有我们设置的handler(kern/trapentry.S)地址,也就是说,从处理器开始执行handler(kern/trapentry.S)的代码开始,实际上就已经陷入内核态了【是kern文件夹下的code了】。但是在handler(kern/trapentry.S)和_alltraps(kern/trapentry.S)构造了trap frame之后【这里使用了内核栈】,进入trap(kern/trap.c)时,才开始检测是否该次trap是由用户态陷入到内核态的?若是,则执行后续的一些内核代码时,为避免并发错误,就需要先获得内核锁【在trap()是才申请内核锁】,以确保仅有一个CPU正在执行那些可能产生并发错误的内核代码。
- 也就是说,中断发生时,由硬件切换到内核栈,在该CPU对应的内核栈中构造此次Trap的Trap frame,构造完成之后在trap(kern/trap.c)当中**才去申请获得内核锁**。倘若所有CPU共享内核栈,由于CPU能够并行地引发Trap,那么每个CPU在为它们当前正在执行的Environment构造Trap frame时就会产生混乱,从而引发错误。
When an interrupt occurs, the hardware automatically pushes
- uint32_t tf_err
- uint32_t tf_eip
- uint16_t tf_cs
- uint16_t tf_padding3
- uint32_t tf_eflags to kernel stack before checking the lock.
So it will just mess up.【注意kern/trapentry.S中的宏TRAPHANDLER_NOEC和TRAPHANDLER只是选择性的push 中断号,trap frame的其他内容都是由硬件push到内核栈上的】
Challenge!
big kernel lock简单易用。然而,它消除了内核模式下的所有并发可能。而大多数现代操作系统使用不同的锁来保护其共享状态的不同部分,这种方法称为细粒度锁定( fine-grained locking)。细粒度锁定可以显著提高性能,但是更难实现且容易出错。【内核代码的不同部分(相互不影响)可以并发运行,增加了CPU陷入kernel的机会,提升性能】
Locking的粒度可以自行决定。作为提示,考虑使用自旋锁(spin locks)来确保对 JOS 内核中这些共享组件的独占访问:
- The page allocator.
- The console driver.
- The scheduler.
- The inter-process communication (IPC) state that you will implement in the part C.
Round-Robin Scheduling
下一个任务是更改 JOS 内核以便它能够以“循环”的方式在多个environment之间轮流切换。主要是修改sched_yield()函数来决定某个调用这个函数的CPU现在执行哪一个environment。
Round-robin scheduling in JOS works as follows:
- The function
sched_yield()in the newkern/sched.cis responsible for selecting a new environment to run.kern/sched.c中的sched_yield()以循环顺序的方式负责选择下一个执行的environment。- It searches sequentially through the
envs[]array in circular fashion, starting just after the previously running environment (or at the beginning of the array if there was no previously running environment), picks the first environment it finds with a status ofENV_RUNNABLE(seeinc/env.h), and callsenv_run()to jump into that environment.
sched_yield()must never run the same environment on two CPUs at the same time.- It can tell that an environment is currently running on some CPU (possibly the current CPU) because that environment’s status will be
ENV_RUNNING.
- It can tell that an environment is currently running on some CPU (possibly the current CPU) because that environment’s status will be
- We have implemented a new system call for you,
sys_yield(), which user environments can call to invoke the kernel’ssched_yield()function and thereby voluntarily give up【主动释放CPU控制权】 the CPU to a different environment.
Exercise 6
Implement round-robin scheduling in
sched_yield()as described above. Don’t forget to modifysyscall()to dispatchsys_yield().Make sure to invoke
sched_yield()inmp_main.Modify
kern/init.cto create three (or more!) environments that all run the programuser/yield.c.After the
yieldprograms exit, there will be no runnable environment in the system, the scheduler should invoke the JOS kernel monitor.
// Choose a user environment to run and run it.
void
sched_yield(void)
{
	struct Env *idle;

	// Implement simple round-robin scheduling.
	//
	// Search through 'envs' for an ENV_RUNNABLE environment in
	// circular fashion starting just after the env this CPU was
	// last running.  Switch to the first such environment found.
	//
	// If no envs are runnable, but the environment previously
	// running on this CPU is still ENV_RUNNING, it's okay to
	// choose that environment.
	//
	// Never choose an environment that's currently running on
	// another CPU (env_status == ENV_RUNNING). If there are
	// no runnable environments, simply drop through to the code
	// below to halt the cpu.

	// LAB 4: Your code here.
	uint32_t curenvIdx = curenv?ENVX(curenv->env_id):0;
	uint32_t offset;
	for(offset=0;offset<NENV;offset++){
		uint32_t nextidx = (curenvIdx + offset)%NENV;
		if (envs[nextidx].env_status == ENV_RUNNABLE)
		{
			env_run(&envs[nextidx]);
		}
	}
	if(curenv && curenv->env_status==ENV_RUNNING){
		env_run(curenv);
	}
	// sched_halt never returns
	sched_halt();
}
此后在kern/syscall.c中的syscall()中加入以下内容,支持用户态调用sys_yield():
 case SYS_yield:
        sys_yield();
		return 0;
        break;
// 用户调用sys_yield,相当于调用了之前实现的sched_yield【主动释放CPU,调度了用户环境/进程】。
// Deschedule current environment and pick a different one to run.
static void sys_yield(void){
	sched_yield();
}
同时在i386_init()中通过ENV_CREATE创建几个初始的用户环境:
ENV_CREATE(user_yield, ENV_TYPE_USER);
ENV_CREATE(user_yield, ENV_TYPE_USER);
ENV_CREATE(user_yield, ENV_TYPE_USER);
//user_yield是/user/yield.c程序。
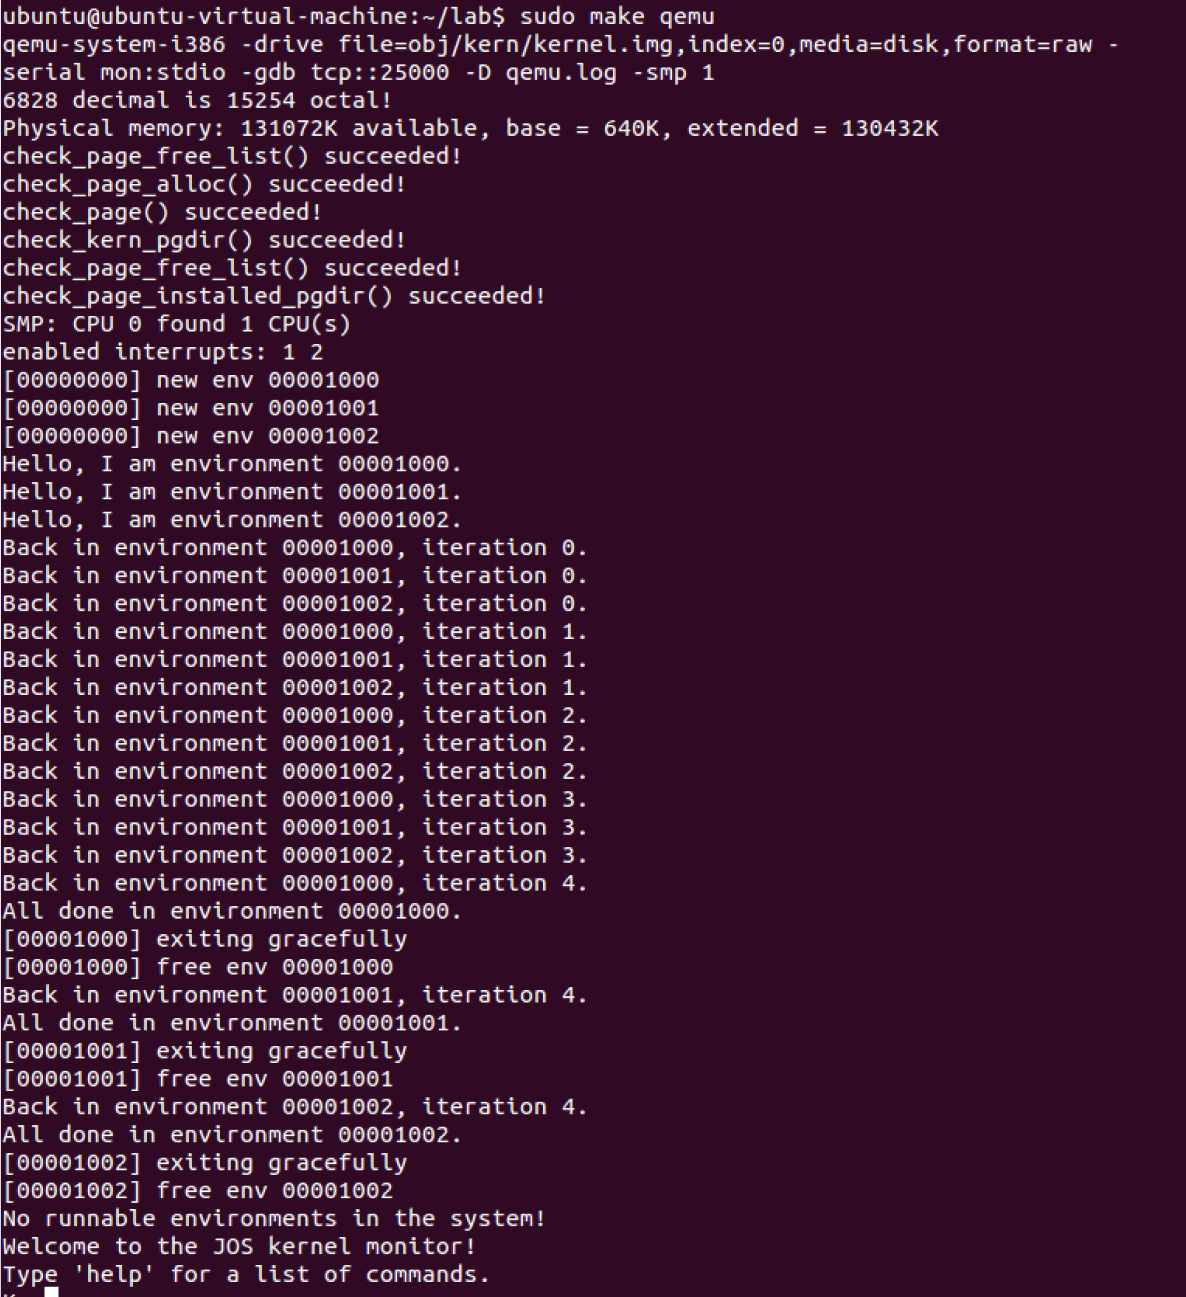
Run make qemu. 在终止之前,您应该可以看到environments在彼此之间来回/循环切换五次,如下所示:
Test also with several CPUS: make qemu CPUS=2.
...
Hello, I am environment 00001000.
Hello, I am environment 00001001.
Hello, I am environment 00001002.
Back in environment 00001000, iteration 0.
Back in environment 00001001, iteration 0.
Back in environment 00001002, iteration 0.
Back in environment 00001000, iteration 1.
Back in environment 00001001, iteration 1.
Back in environment 00001002, iteration 1.
...
Question
In your implementation of
env_run()you should have calledlcr3(). Before and after the call tolcr3(), your code makes references (at least it should) to the variablee, the argument toenv_run.Upon loading the
%cr3register, the addressing context used by the MMU is instantly changed. But a virtual address (namelye) has meaning relative to a given address context–the address context specifies the physical address to which the virtual address maps.Why can the pointer
ebe dereferenced both before and after the addressing switch?
因为不仅高于KERNBASE之上的映射关系在任何Environment都是一样的,并且Read-Only Environment也是一样的。【每个进程的页表中都是存在内核映射的。每个进程页表中虚拟地址高于UTOP之上的地方,只有UVPT不一样,其余的都是一样的。】
所有的environment都是以kern_pgdir为模板建立的【详见env_setup_vm()】,因此e作为指针参数,在不同的environment中都指向同一个地址,在READ-ONLY ENVS附近。
// Context switch from curenv to env e.
// Note: if this is the first call to env_run, curenv is NULL.
//
// This function does not return.
//
void
env_run(struct Env *e)
{
	if (curenv!=NULL && curenv->env_status == ENV_RUNNING) {
		curenv->env_status = ENV_RUNNABLE;
	}
	curenv = e;
	curenv->env_status = ENV_RUNNING;
	curenv->env_runs++;
	lcr3(PADDR(e->env_pgdir));	//加载页目录的物理地址到cr3【页表切换】
	unlock_kernel();
	env_pop_tf(&(e->env_tf));	//之后还是使用了e
}
Whenever the kernel switches from one environment to another, it must ensure the old environment’s registers are saved so they can be restored properly later. Why? Where does this happen?
这样才能在Environment发生切换的时候恢复到该Environment进入Trap前的一样状态。
很明显,这种保存是发生在kern/trap.c:trap中的curenv->env_tf = *tf,当此次Trap是由用户态触发的时候,将trap frame完整保存到curenv->env_tf中,这样在env_pop_tf时,就能恢复现场了。
void
trap(struct Trapframe *tf)
{
	/* …… */

	if ((tf->tf_cs & 3) == 3) {
		// Trapped from user mode.
		// Acquire the big kernel lock before doing any
		// serious kernel work.
		// LAB 4: Your code here.
		lock_kernel();
		assert(curenv);

		// Garbage collect if current enviroment is a zombie
		if (curenv->env_status == ENV_DYING) {
			env_free(curenv);
			curenv = NULL;
			sched_yield();
		}
		//保存完整的用户态状态,以便之后切换回去
		// Copy trap frame (which is currently on the stack)
		// into 'curenv->env_tf', so that running the environment
		// will restart at the trap point.
		curenv->env_tf = *tf;
		// The trapframe on the stack should be ignored from here on.
		tf = &curenv->env_tf;
	}

	// Record that tf is the last real trapframe so
	// print_trapframe can print some additional information.
	last_tf = tf;

	// Dispatch based on what type of trap occurred
	trap_dispatch(tf);			//分派trap

	// If we made it to this point, then no other environment was
	// scheduled, so we should return to the current environment
	// if doing so makes sense.
	if (curenv && curenv->env_status == ENV_RUNNING)		//处理完trap,恢复运行curenv
		env_run(curenv);	//其中的env_pop_tf(&(e->env_tf));进行现场恢复
	else
		sched_yield();										//或者重新调度新的环境。
}
Again,因为不保存下来就无法正确地恢复到原来的环境。用户进程之间的切换,会调用系统调用sched_yield();用户态陷入到内核态,可以通过中断、异常、系统调用;这样的切换之处都是要在系统栈上建立用户态的TrapFrame,在进入trap()函数后,语句curenv->env_tf = *tf;将内核栈上需要保存的寄存器的状态实际保存在用户环境的env_tf域中。
Challenge!
①Add a less trivial scheduling policy to the kernel, such as a fixed-priority scheduler that allows each environment to be assigned a priority and ensures that higher-priority environments are always chosen in preference to lower-priority environments. (Look up “lottery scheduling” and “stride scheduling” in Google.)【实现一个不那么trivial的调度策略,比如固定优先级的调度程序,允许为每个环境分配优先级,并确保总是优先选择优先级较高的环境运行】
思路: 在env的结构体中加入一个成员env_priority, 如果实现静态的优先级,直接在env_create中进行初始化就好了。 若需要动态变化,需要实现一个修改优先级的系统调用。 最后在sched_yield()中扫描整个envs数组,得到优先级最高并且states为runable的环境。
参考:https://qinstaunch.github.io/2020/01/24/MIT-6-828-LAB4-Preemptive-Multitasking/#challenge-extend-more-complex-scheduling-policy
②The JOS kernel currently does not allow applications to use the x86 processor’s x87 floating-point unit (FPU), MMX instructions, or Streaming SIMD Extensions (SSE). 扩展 Env 结构体,为处理器的浮点状态提供保存空间,并扩展上下文切换代码,以便在从一个环境切换到另一个环境时正确地保存和恢复这种状态。The FXSAVE and FXRSTOR instructions may be useful
System Calls for Environment Creation
尽管您的内核现在能够在多个用户级环境之间运行和切换,但它仍然局限于内核最初设置的运行环境【通过ENV_CREATE写死的】。
现在,您将实现必要的 JOS 系统调用,以允许用户环境创建和启动其他新的用户环境,也就是fork()。
Unix provides the fork() system call as its process creation primitive.
Unix fork ()复制父进程的整个地址空间,以创建新进程(子进程)。从用户空间角度看,两个进程 id 之间的唯一区别本身的进程 id 和父进程 id (分别由 getpid 和 getppid 返回)。在父进程中,fork ()返回子进程 ID,而在子进程中,fork ()返回0。默认情况下,每个进程都有自己的私有地址空间,而且对于另一个进程,对内存的修改都是不可见的。
You will provide a different, more primitive set of JOS system calls for creating new user-mode environments. With these system calls you will be able to implement a Unix-like fork() entirely in user space, in addition to other styles of environment creation.
因此在真正实现fork之前,我们先准备一些系统调用。您将为 JOS 编写的新系统调用如下:
-
sys_exofork:创建了一个几乎空白的新环境,没有任何东西映射到它的地址空间的user space中,而且它不能运行。
- This system call creates a new environment with an almost blank slate: nothing is mapped in the user portion of its address space, and it is not runnable. The new environment will have the same register state as the parent environment at the time of the
sys_exoforkcall. - In the parent,
sys_exoforkwill return theenvid_tof the newly created environment (or a negative error code if the environment allocation failed). In the child, however, it will return 0. (Since the child starts out marked as not runnable,sys_exoforkwill not actually return in the child until the parent has explicitly allowed this by marking the child runnable using….)
- This system call creates a new environment with an almost blank slate: nothing is mapped in the user portion of its address space, and it is not runnable. The new environment will have the same register state as the parent environment at the time of the
-
sys_env_set_status:设定环境的状态为
ENV_RUNNABLE或ENV_NOT_RUNNABLE.- Sets the status of a specified environment to
ENV_RUNNABLEorENV_NOT_RUNNABLE. This system call is typically used to mark a new environment ready to run, once its address space and register state has been fully initialized.
- Sets the status of a specified environment to
-
sys_page_alloc:分配物理内存页并将其映射到给定environment的地址空间中的某个虚拟地址处。
- Allocates a page of physical memory and maps it at a given virtual address in a given environment’s address space.
-
sys_page_map: 复制一个页面映射
Copy a page mapping (not the contents of a page!) from one environment’s address space to another, leaving a memory sharing arrangement in place so that the new and the old mappings both refer to the same page of physical memory.
-
sys_page_unmap:解除页面映射。
Unmap a page mapped at a given virtual address in a given environment.
The JOS kernel supports the convention that a value of 0 means “the current environment.”这个约定具体由 kern/env.c 中的 enev2env ()实现。
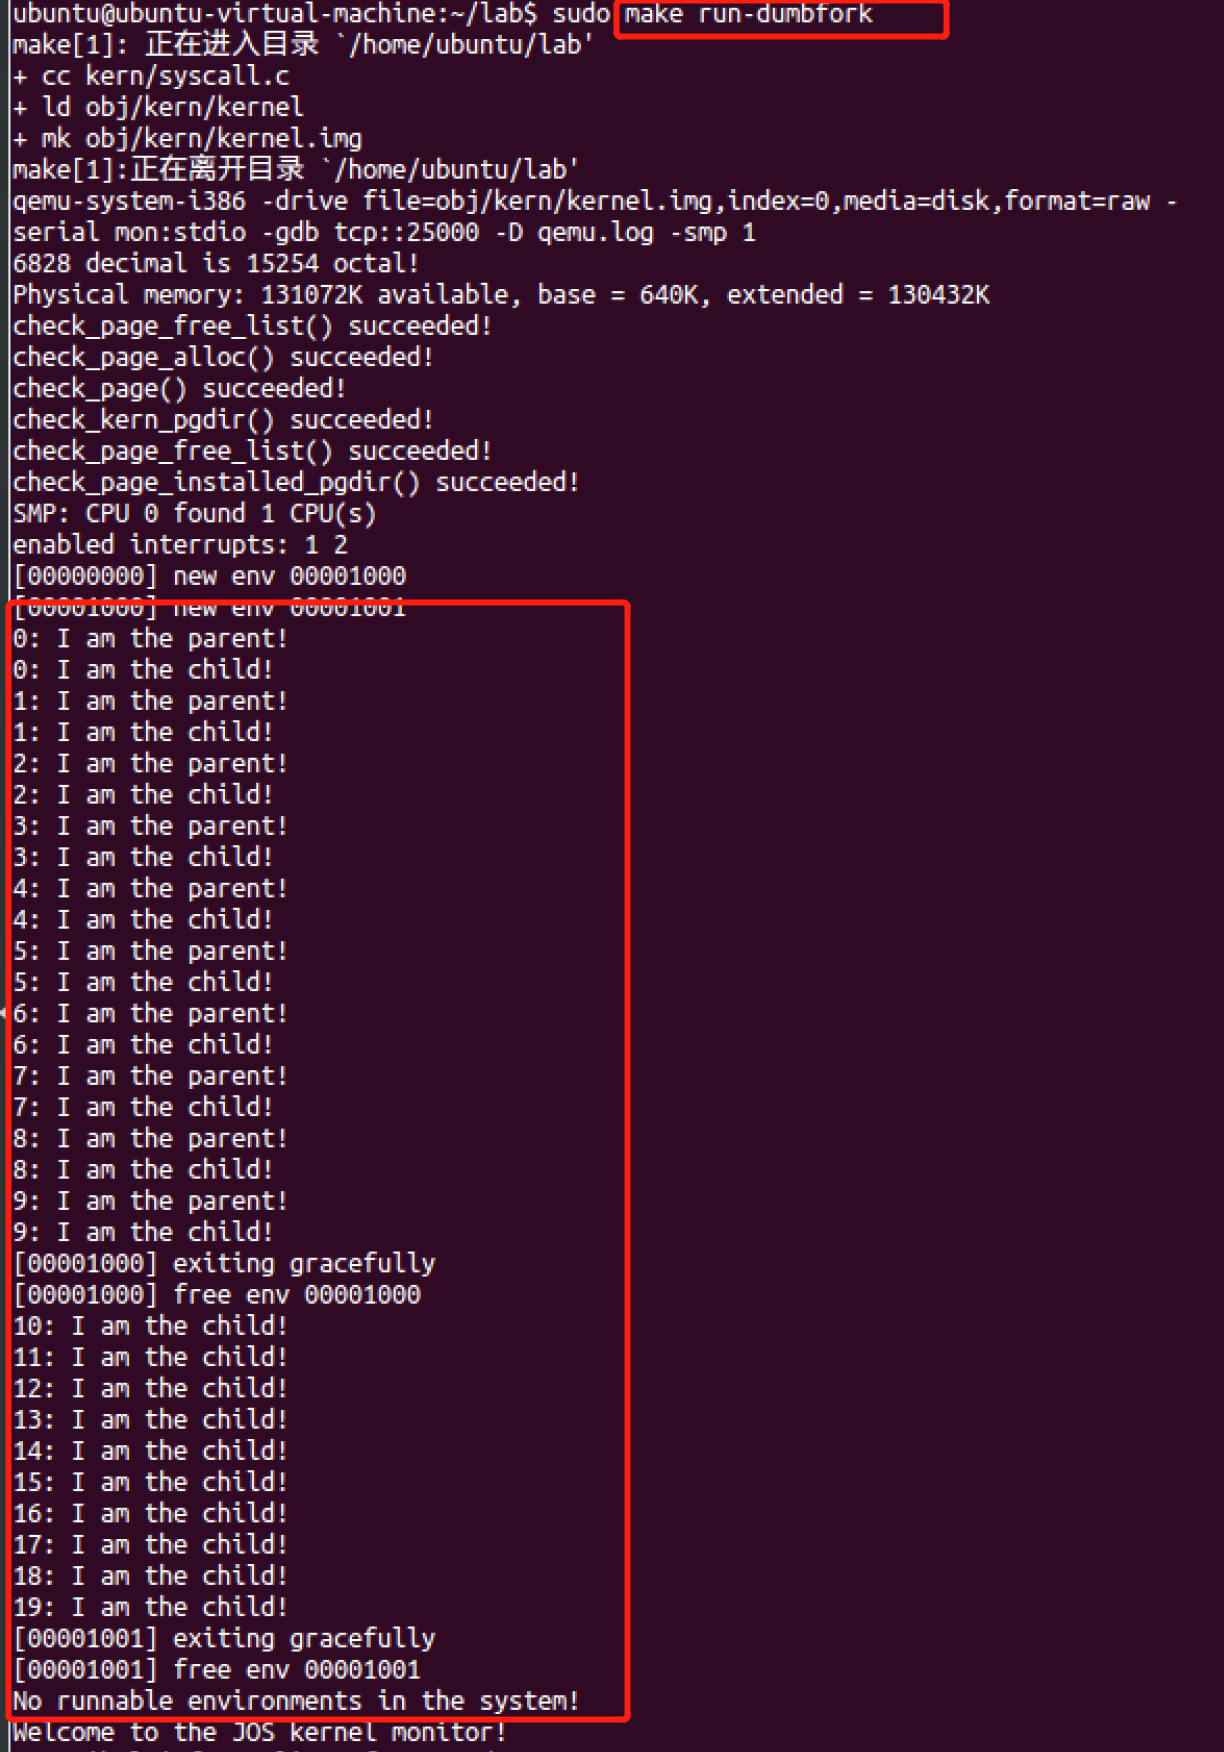
我们在测试程序 user/dumbfork.c 中提供了一个非常原始的Unix-like fork ()实现。此测试程序使用上述系统调用创建并运行a child environment with a copy of its own address space。然后这两个environments 使用sys_yield()来回切换【switch back and forth】,就像在前面的练习中一样。父节点在10次迭代后退出,而子节点在20次迭代后退出。
Exercise 7
Implement the system calls described above in
kern/syscall.cand make suresyscall()calls them.You will need to use various functions in
kern/pmap.candkern/env.c, particularlyenvid2env().For now, whenever you call
envid2env(), pass 1 in thecheckpermparameter.【注意每次调用envid2env()都要讲第三个参数设置为1,即要求通过id获取的env指针的进程是这个进程本身或者其直系父进程】Be sure you check for any invalid system call arguments, returning
-E_INVALin that case.
首先分析一下最基础的被调函数:
// Converts an envid to an env pointer. 【基于参数envid,返回对应的env环境指针】
// If checkperm is set, the specified environment must be either the
// current environment or an immediate child of the current environment.
//
// RETURNS
//   0 on success, -E_BAD_ENV on error.
//   On success, sets *env_store to the environment.
//   On error, sets *env_store to NULL.
//
int
envid2env(envid_t envid, struct Env **env_store, bool checkperm)
{
	struct Env *e;

	// If envid is zero, return the current environment.
	if (envid == 0) {
		*env_store = curenv;
		return 0;
	}

	// Look up the Env structure via the index part of the envid,
	// then check the env_id field in that struct Env
	// to ensure that the envid is not stale
	// (i.e., does not refer to a _previous_ environment
	// that used the same slot in the envs[] array).
	e = &envs[ENVX(envid)];
	if (e->env_status == ENV_FREE || e->env_id != envid) {
		*env_store = 0;
		return -E_BAD_ENV;
	}

	// Check that the calling environment has legitimate permission
	// to manipulate the specified environment.
	// If checkperm is set, the specified environment
	// must be either the current environment
	// or an immediate child【直接的孩子节点】 of the current environment.
	if (checkperm && e != curenv && e->env_parent_id != curenv->env_id) {
		*env_store = 0;
		return -E_BAD_ENV;
	}

	*env_store = e;
	return 0;
}
首先实现sys_exofork:
// Allocate a new environment.
// Returns envid of new environment, or < 0 on error. Errors are:
// -E_NO_FREE_ENV if no free environment is available.
// -E_NO_MEM on memory exhaustion.
static envid_t
sys_exofork(void)
{
// Create the new environment with env_alloc(), from kern/env.c.
// It should be left as env_alloc created it, except that
// status is set to ENV_NOT_RUNNABLE, and the register set is copied
// from the current environment -- but tweaked so sys_exofork
// will appear to return 0.
// LAB 4: Your code here.
struct Env *newEnv, *currentEnv;
int32_t flag;
// Obtain current environment corresponding to exerceise 7's hints in lab references.
// arguments 0 means the current environment.
envid2env(0, ¤tEnv, 1); //首先获取当前环境。其实就是curenv
assert(currentEnv);
//通过env_alloc(&newEnv, currentEnv->env_id)来分配新的空环境,父进程id设置为currentEnv->env_id
if((flag = env_alloc(&newEnv, currentEnv->env_id)) < 0)return flag; // fail on creating a new environment.
// env_alloc set newEnv's env_status with ENV_RUNNABLE by default,we have to set it with ENV_NOT_RUNNABLE by our own.
newEnv->env_status = ENV_NOT_RUNNABLE;
// copy register states from parent environment.
newEnv->env_tf = currentEnv->env_tf;
//fork()的实现在于创建一个环境并且进行环境复制(tf),以至于子进程也像调用了sys_exofork【复制了栈帧位置和程序的eip指令指针等(注意eip指向**用户程序**中sys_exofork系统调用的下一条指令,相当于子进程被调度后,eax直接读取的是0,不是通过sys_exofork->syscall->trap_dispatch的return返回而赋值给regs->reg_eax的,所以子进程是进行了fake的sys_exofork,只需要简单保存父进程的env_tf即可)】,并且因为设置了eax,其返回0(从而可以区分父子进程)。
//注意tf中保存的是用户态栈帧的状态,而不是实时跟随父进程。也就是tf保存的父进程进入kernel之前的regs情况,所以tf->eip不等于现在的eip,tf->eip指向的是用户态调用fork之后的那个指令,而eip随时跟踪程序状态,指向了kernel中的fork函数内的指令。
//因此子进程在被调度的时候,直接从用户态继续执行,这时候通过tf恢复用户态,会直接读取tf->eax作为返回值,为0。而父进程的tf->eax在kernel的syscall()返回时被设置为子进程pid,之后被调度则读取tf->eax作为返回值,为child_pid。【因此fork函数就是通过这种方式来实现父子进程的返回值不同的】
// sys_exofork should return 0 in child environment by set register %eax with 0.Howerver,we set newEnv->env_tf
// with ENV_NOT_RUNNABLE above,the new environment can't run util parent environment has allowed it explicitly.
newEnv->env_tf.tf_regs.reg_eax = 0; //控制子进程return 0【子进程被设置为RUNNABLE时候
return newEnv->env_id; //控制父进程返回子进程的id
}
接下来实现sys_env_set_status设置env的status。只能设置为ENV_RUNNABLE或者ENV_NOT_RUNNABLE。
// Set envid's env_status to status, which must be ENV_RUNNABLE
// or ENV_NOT_RUNNABLE.
//
// Returns 0 on success, < 0 on error.  Errors are:
//	-E_BAD_ENV if environment envid doesn't currently exist,
//		or the caller doesn't have permission to change envid.
//	-E_INVAL if status is not a valid status for an environment.
static int
sys_env_set_status(envid_t envid, int status)
{
	// Hint: Use the 'envid2env' function from kern/env.c to translate an
	// envid to a struct Env.
	// You should set envid2env's third argument to 1, which will
	// check whether the current environment has permission to set
	// envid's status.

	// LAB 4: Your code here.
	struct Env *theEnv;
	if(envid2env(envid, &theEnv, 1) < 0)return -E_BAD_ENV;	//注意这的最后一个参数checkperm要设置为1,检查修改这个env的进程是要么是这个env的父进程,要么就是env自己。不然不允许随便进行状态修改。
	if(status != ENV_RUNNABLE && status != ENV_NOT_RUNNABLE)return -E_INVAL;
	theEnv->env_status = status;
	return 0;
}
然后实现sys_page_alloc,分配一页空的内存【content为空】,映射在va虚拟地址下:
// Allocate a page of memory and map it at 'va' with permission
// 'perm' in the address space of 'envid'.
// The page's contents are set to 0.
// If a page is already mapped at 'va', that page is unmapped as a
// side effect.
//
// perm -- PTE_U | PTE_P must be set, PTE_AVAIL | PTE_W may or may not be set,
//         but no other bits may be set.  See PTE_SYSCALL in inc/mmu.h.
//
// Return 0 on success, < 0 on error.  Errors are:
//	-E_BAD_ENV if environment envid doesn't currently exist,
//		or the caller doesn't have permission to change envid.
//	-E_INVAL if va >= UTOP, or va is not page-aligned.
//	-E_INVAL if perm is inappropriate (see above).
//	-E_NO_MEM if there's no memory to allocate the new page,
//		or to allocate any necessary page tables.
static int
sys_page_alloc(envid_t envid, void *va, int perm)
{
	// Hint: This function is a wrapper around page_alloc() and
	//   page_insert() from kern/pmap.c.
	//   Most of the new code you write should be to check the
	//   parameters for correctness.
	//   If page_insert() fails, remember to free the page you
	//   allocated!
	//	其实就是根据注释一步一步完成,做好权限和特殊情况的排查和处理。
	// LAB 4: Your code here.
	struct Env *theEnv;
	struct PageInfo *pageInfo;
	int32_t leastPerm = (PTE_U | PTE_P);
	if(envid2env(envid, &theEnv, 1) < 0)return -E_BAD_ENV;
	if((uintptr_t)va >= UTOP || ((uintptr_t)va & (PGSIZE - 1)))return -E_INVAL;
	if((perm & leastPerm) != leastPerm || (perm & (~PTE_SYSCALL)))return -E_INVAL;
	if(!(pageInfo = page_alloc(ALLOC_ZERO)))return -E_NO_MEM;
	if(page_insert(theEnv->env_pgdir, pageInfo, va, perm) < 0){
		page_free(pageInfo);
		return -E_NO_MEM;
	}
	return 0;
}
// See PTE_SYSCALL in inc/mmu.h.
// Flags in PTE_SYSCALL may be used in system calls.  (Others may not.)
#define PTE_SYSCALL	(PTE_AVAIL | PTE_P | PTE_W | PTE_U)
最后剩下sys_page_map和sys_page_unmap:
// Map the page of memory at 'srcva' in srcenvid's address space
// at 'dstva' in dstenvid's address space with permission 'perm'.
// Perm has the same restrictions as in sys_page_alloc, except
// that it also must not grant write access to a read-only
// page.
// 这个系统调用是将src va处的页映射到dst va处的页下
// 两个虚拟页共享同一个物理页。
// Return 0 on success, < 0 on error.  Errors are:
//	-E_BAD_ENV if srcenvid and/or dstenvid doesn't currently exist,
//		or the caller doesn't have permission to change one of them.
//	-E_INVAL if srcva >= UTOP or srcva is not page-aligned,
//		or dstva >= UTOP or dstva is not page-aligned.
//	-E_INVAL is srcva is not mapped in srcenvid's address space.
//	-E_INVAL if perm is inappropriate (see sys_page_alloc).
//	-E_INVAL if (perm & PTE_W), but srcva is read-only in srcenvid's
//		address space.
//	-E_NO_MEM if there's no memory to allocate any necessary page tables.
static int
sys_page_map(envid_t srcenvid, void *srcva,
	     envid_t dstenvid, void *dstva, int perm)
{
	// Hint: This function is a wrapper around page_lookup() and
	//   page_insert() from kern/pmap.c.
	//   Again, most of the new code you write should be to check the
	//   parameters for correctness.
	//   Use the third argument to page_lookup() to
	//   check the current permissions on the page.

	// LAB 4: Your code here.
	pte_t *srcPte;
	int32_t leastPerm = (PTE_U | PTE_P);
	struct PageInfo *srcPageInfo;
	struct Env *srcEnv, *dstEnv;
	if(envid2env(srcenvid, &srcEnv, 1) < 0 || envid2env(dstenvid, &dstEnv, 1) < 0)return -E_BAD_ENV;
	if((uintptr_t)srcva >= UTOP || (uintptr_t)dstva >= UTOP || ((uintptr_t)srcva & (PGSIZE - 1)) || ((uintptr_t)dstva & (PGSIZE - 1)))return -E_INVAL;
	if((perm & leastPerm) != leastPerm || (perm & (~PTE_SYSCALL)))return -E_INVAL; // PTE_SYSCALL == PTE_U | PTE_P | PTE_AVAIL | PTE_W
	if(!(srcPageInfo = page_lookup(srcEnv->env_pgdir, srcva, &srcPte)))return -E_INVAL;
    //通过page_lookup查找对应的物理页srcPageInfo,通过page2pa()宏可以确定物理页地址
	if((perm & PTE_W) && !((*srcPte) & PTE_W))return -E_INVAL;
    //因此最终调用page_insert,将物理页srcPageInfo,映射到页表dstEnv->env_pgdir下的dstva地址处。
	return page_insert(dstEnv->env_pgdir, srcPageInfo, dstva, perm);
}

// Unmap the page of memory at 'va' in the address space of 'envid'.
// If no page is mapped, the function silently succeeds.
//
// Return 0 on success, < 0 on error.  Errors are:
//	-E_BAD_ENV if environment envid doesn't currently exist,
//		or the caller doesn't have permission to change envid.
//	-E_INVAL if va >= UTOP, or va is not page-aligned.
static int
sys_page_unmap(envid_t envid, void *va)
{
	// Hint: This function is a wrapper around page_remove().
	// 其实是page_remove的wrapper,将pte清空,减少page的ref计数。
	// LAB 4: Your code here.
	struct Env *theEnv;
	if(envid2env(envid, &theEnv, 1) < 0)return -E_BAD_ENV;
	if((uintptr_t)va >= UTOP || (uintptr_t)va & (PGSIZE - 1))return -E_INVAL;
	page_remove(theEnv->env_pgdir, va);
	return 0;
}
实现了上述系统调用后,在kern/syscall.c的syscall()中追加系统调用入口:
//注意设置return,以及分配系统调用时的参数转换。
	case SYS_page_alloc:
        return sys_page_alloc((envid_t)a1, (void * )a2, (int )a3);
        break;
    case SYS_page_map:
        return sys_page_map((envid_t) a1, (void *) a2, (envid_t) a3, (void *) a4, (int) a5);
        break;
    case SYS_page_unmap:
        return sys_page_unmap((envid_t) a1, (void *) a2);
        break;
    case SYS_exofork:
        return sys_exofork();
        break;
	case SYS_env_set_status:
		return sys_env_set_status((envid_t) a1, (int) a2);
		break;
Test your JOS kernel with
user/dumbforkand make sure it works before proceeding.【make run-dumbfork】
最后我们应该看看dumbfork是怎么运行的。大致的逻辑是usr/umbfork.c中,父进程通过sys_exofork()创建1个子进程,然后进行进程空间的复制映射(从UTEXT开始,包括栈帧),并通过sys_env_set_status来设置子进程为RUNNABLE。这样父子进程都可以被调度以后,每个进程每次打印1条信息后交出控制权,并且让父进程重复10次而子进程重复20次。
Ending Part A